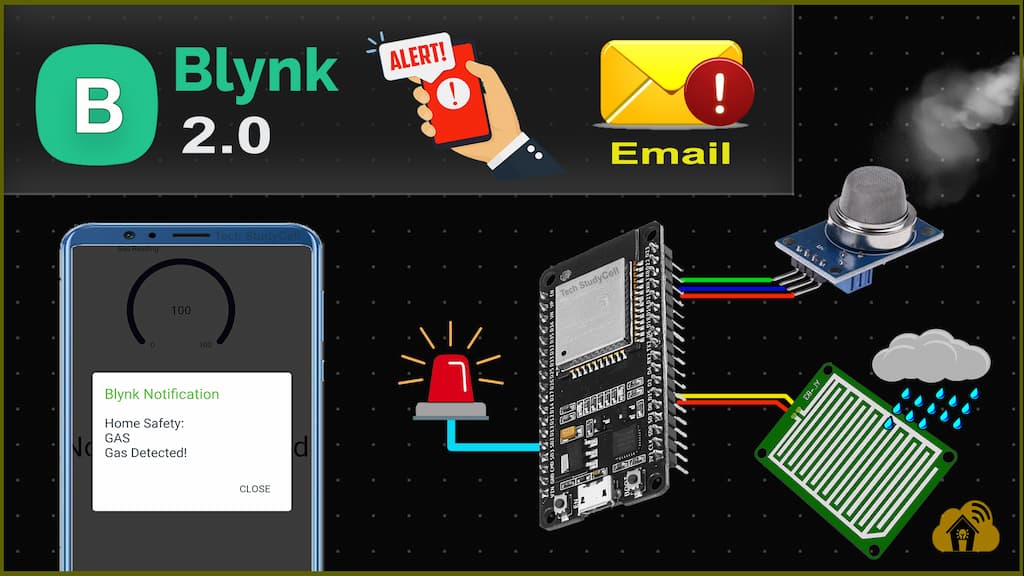
In this IoT project, I have explained how to make an MQ2 gas sensor and rain detection system using ESP8266 or ESP32 with Blynk Notification. If there is any gas leakage or rain, you get the Alert in your mobile notification and email in your inbox from anywhere in the world.

Table of Contents
Features of this Blynk IoT Project on Home Safety
- If the WiFi is available, ESP32 or NodeMCU will automatically connect with WiFi.
- You will get Mobile Notification and Email Alert for Gas leakage or rain.
- In offline, the RED LED will glow if Gas leakage or rain is detected.
Required Components for MQ2 Gas and Rain Detector
- ESP32 or NodeMCU
- MQ2 Gas sensor
- Rain sensor module
- 1k 1/4 watt resistors (2no)
- LEDs (2no)
Circuit of Rain Detector and MQ2 Gas Sensor

In the circuit, I have used ESP32. The MQ-2 Gas sensor analog output is connected with the GPIO D35.
And the Rain detector module’s digital output is connected with the GPIO D34.
The Indicator LEDs are connected with GPIO D14 & D25.
If required you can also connect the buzzer across GPIO D25 and GND instead of the red LED.
The ESP32 board LED connected with GPIO D2 is used as the Wi-Fi indicator.

In the NodeMCU circuit, the MQ-2 Gas sensor analog output is connected with the GPIO A0.
And the Rain detector module’s digital output is connected with the D1 (GPIO 5).
The Indicator LEDs are connected with GPIO D5 & D7.
If required you can also connect the buzzer across GPIO D7 and GND instead of the red LED.
The ESP32 board LED connected with GPIO D0 is used as the Wi-Fi indicator.

As you can see, I have made the complete circuit on breadboard. Here I have used ESP32, but you can also use NodeMCU ESP8266.
Set up Blynk IoT Cloud for the IoT-based Project
You can refer to the following article to set up the new Blynk cloud account
Getting started with New Blynk 2.0 IoT platform
Create Blynk Template
During creating the template, I have selected ESP32 as hardware, but as we will use Virtual Pins to create Datastreams, so we can connect any microcontroller with this template.
Create Datastreams in Blynk cloud

Here I have used 2 sensors (MQ-2 and Rain sensor) so I have created 2 Datastreams to display the reading. If you want to connect 10 sensors then create 10 Datastreams.
Add New Event in Blynk
To get the Alert email or mobile notification, you have to add new event.

I have added two events (GAS and RAIN). Whenever any event occur, I will get the Alert in Mobile and email.
Create Web Dashboard

After that, click and drag Gauge and Label widgets according to the number of sensors.
Then click on “Save“.
Add Device in Blynk Cloud using Template
You can refer to the following article to add a device in the Blynk cloud.
Add Device in Blynk Cloud from Template
Program NodeMCU or ESP32 with Arduino IDE
For this IoT-based home automation project, I have used the Arduino IDE to program NodeMCU.
First update the Preferences –> Aditional boards Manager URLs: https://dl.espressif.com/dl/package_esp32_index.json, http://arduino.esp8266.com/stable/package_esp8266com_index.json
- Then install the ESP8266 board from the Board manager or Click Here to download the ESP8266 boards.
- Then install the ESP32 board from the Board manager or Click Here to download the ESP32 board.
- After that install the Blynk library. Click Here to download the Blynk library.
Codes for Blynk IoT Home Safety Project
As for this IoT project you can use both ESP8266 and ESP32, so I have shared all the possible source codes.
After downloading, you have to enter the following details in the code.
- Update the Blynk Template ID and Auth Token.
#define BLYNK_TEMPLATE_ID ""
#define BLYNK_DEVICE_NAME ""
#define BLYNK_AUTH_TOKEN ""- Then enter the WiFi Credentials (WiFi name & password)
// Your WiFi credentials.
// Set password to "" for open networks.
char ssid[] = "";
char pass[] = "";
Now if you have referred to the same circuit and Blynk account setup, then you can directly upload the code. Else you have to mention the Virtual Pins.
#define VPIN_BUTTON_1    V1
#define VPIN_BUTTON_2    V2
And you also have to mention the Event code in the sketch.
Blynk.logEvent("gas", "Gas Detected!");
Blynk.logEvent("rain", "Water Detected!");
Here, “gas” is the event code for the GAS event.
After that go to Tools and for ESP32 select the board as “DOIT ESP32 DEVKIT V1” and for NodeMCU select the board as “NodeMCU 1.0 ESP-12E”. Then select the proper PORT in Arduino IDE.
Then click on the upload button to program the ESP32 or NodeMCU board.
About PCBWay and their services
You can easily order the high-quality PCB at a very reasonable price for any electronics project from PCBWay.

PCBWay not only produces FR-4 and Aluminum boards but also advanced PCBs like Rogers, HDI, Flexible and Rigid-Flex boards, at a very reasonable price.
For the online instant quote page please visit – pcbway.com/orderonline
Inspect your Gerber file before placing the order – OnlineGerberViewer
You may order as small as 5pcs of PCB from the PCBWay. You can place an order as per your requirement.
You can explore different useful PCB projects from the PCBWay Open-source community – pcbway.com/project
For more details please visit the following articles.
Why PCBway
PCB Capabilities
High-Quality PCB
Set up Mobile Dashboard in Blynk IoT app

First Download and install the Blynk IoT App from Google Play Store or App Store.
Steps to configure Mobile dashboard in Blynk IoT app.
- Open the Blynk IoT app, and select the Template.
- Tap on the 3-dash icon and add 1 Gauge & 1 Value Display from the widget Box.
- Tap on the Gauge widget and select the Datastream.
- Tap on the Value Display widget and select the related Datastream. Select Front Size as AUTO.
- Then exit from the EDIT mode.
- Blynk IoT app is ready to monitor the sensor readings.
Testing the Rain Sensor with Blynk Notification

To test the rain sensor, put water drop on the sensor as shown. You will get the RAIN alert in mobile notification.

If the sensor detects any water droplet Blynk will show ‘Water Detected’.
Testing the MQ2 Gas Sensor with Blynk Notification
To test the MQ-2 sensor, I have used a lighter. Just hold the lighter in front of the MQ-2 sensor, and you will receive the notification alert for GAS leakage.

Apart from the Blynk notification, you will also receive the alert through email.
So this is a very useful IoT-based home safety project. You can connect multiple sensors and get the alert with custom messages in your inbox or mobile notification.
I hope you like this IoT project idea with the Blynk app.
Click Here for more such ESP32 projects.
Please do share your feedback on this IoT project. Thank you for your time.


