This article explained step by step guide for the New Blynk IoT Platform setup for ESP8266 & ESP32 to control appliances with the Blynk IoT app.
What are the new features of the Blynk IoT platform?
1. Blynk.360: a web portal to monitor the connected devices, do over-the-air updates.
2. A new approach to device model (template) creation.
3. Blynk.inject: a WI-FI manager built into the new Blynk IoT app.
3. All kinds of Automations (Eventor on steroids).
4. Voice assistants with Amazon Alexa and Google Home (will be available soon).
Related Article: New Blynk ESP8266 Relay control
Table of Contents
Create an account in Blynk IoT Cloud Platform
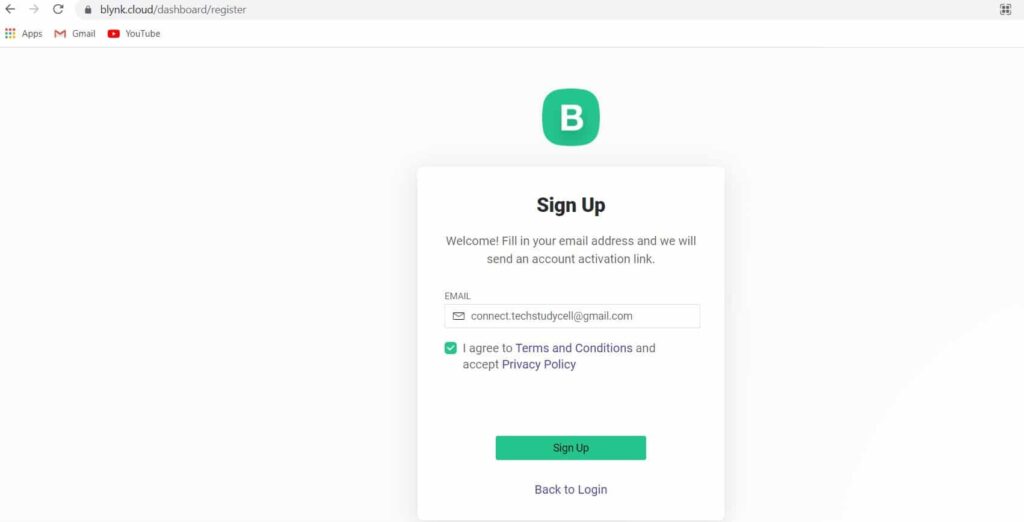
First, you have to create an account in Blynk cloud platform. To sign up click on the following link
https://blynk.cloud/dashboard/register
Enter your email ID and click on Sign Up. After that, you will receive a verification email from Blynk. In that email click on Create Password to set the password for Blynk cloud account.
Create Template in Blynk IoT Cloud
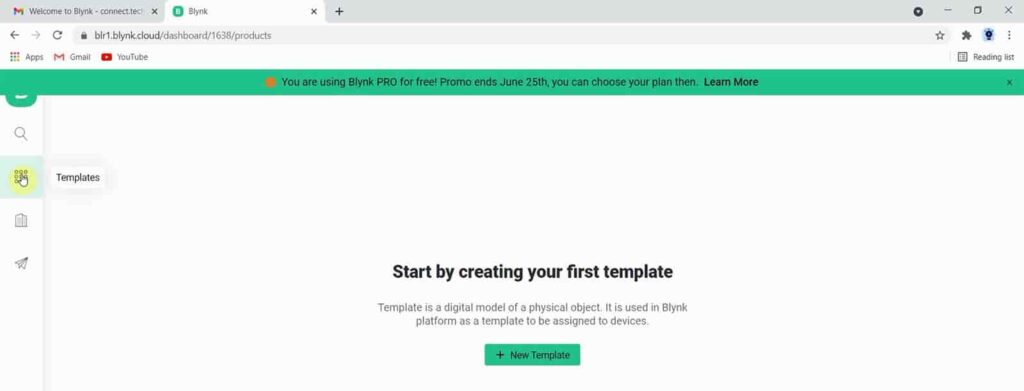
After login to Blynk IoT account, first you have create a template. In the dashboard click on the Templates from the left side menu.
Then click on New Template.
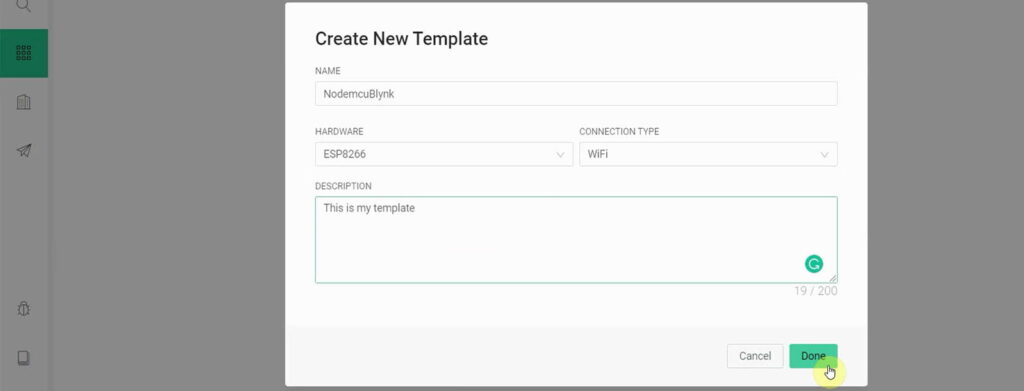
Then, you have to enter a name for that template.
Select the microcontroller or board you will use in the project from the Hardware dropdown menu.
The connection type should be WiFi.
You can enter small description for the template. This field is optional.
Now click on Done.
Create Datastreams in the Blynk IoT template
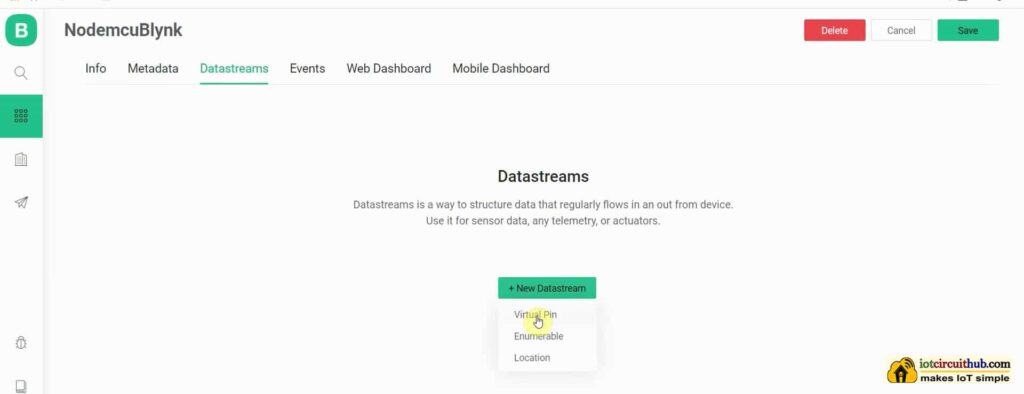
After creating the template, go to Datastreams tab.
Then click on “New Datastream” and select Virtual Pin.
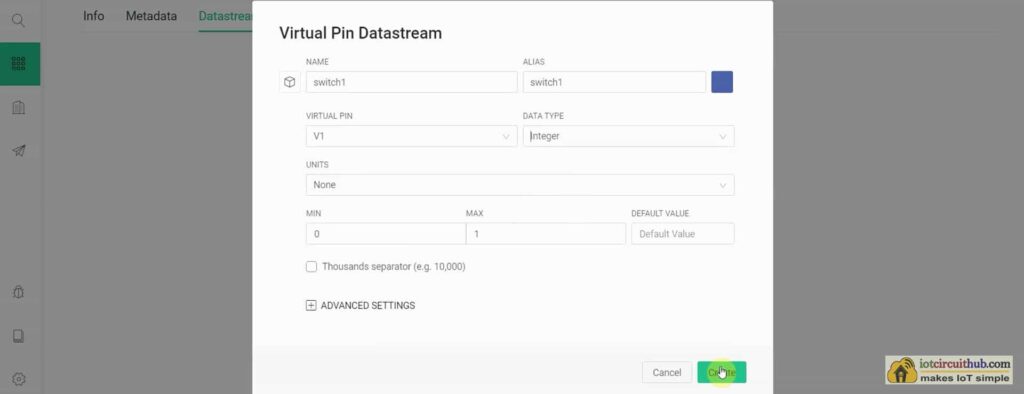
Now, you have to enter a name for this Datastream.
Select the Virtual Pin and Datatype from the dropdown menu as per the requirement.
Here I will control a relay, so I have selected Integer, For the Temparetute you have to select Double datatype and related UNIT.
You can also set the MAX, MIN, and default value for the datastream.
After that click on Create.
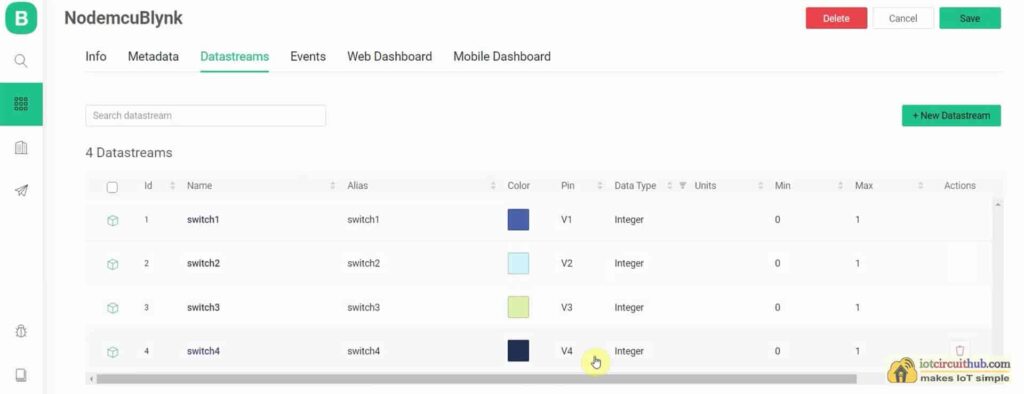
In a similar way, you can add multiple Datastreams as per your requirement. Here I have created 4 Datastreams with Virtual Pin V1, V2, V3, and V4 to control 4 relays.
Create Web Dashboard in the Blynk IoT template
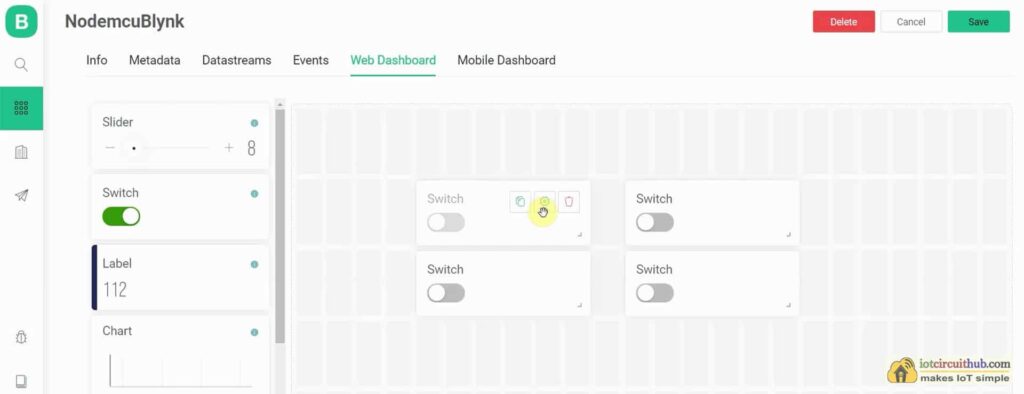
Now, go to the Web Dashboard tab to add widgets.
In the dashboard, you can easily drag and drop any widgets from the left side.
Here I have added 4 Switch widgets to control 4 relays.
Now, if you hover over the widget, you will find a button with a gear icon. Click on the button to go to setting.
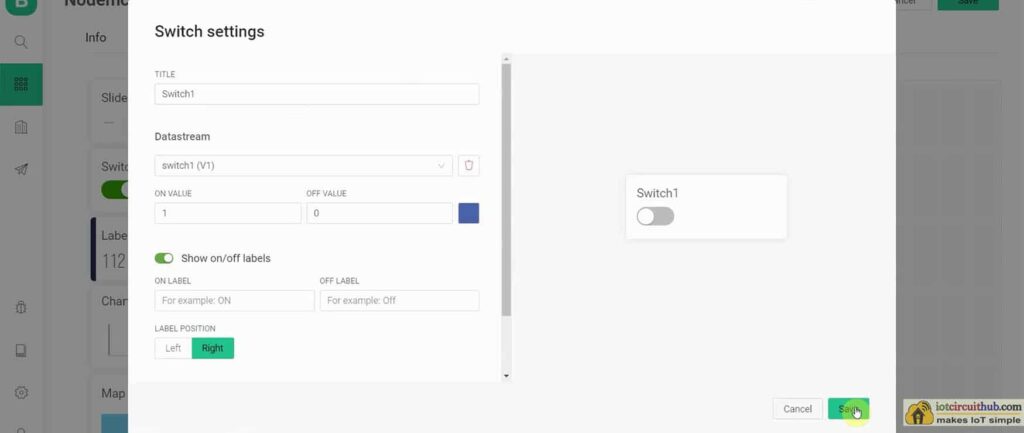
Now enter a name or title for this Switch widget.
Then select a Datastream that you have already created.
Now set the ON VALUE and OFF VALUE for the Switch widget.
Here I have set 1 for ON VALUE and 0 for OFF VALUE. So when I turn on the switch it will send 1 to the connected microcontroller through the selected Datastream and if I turn off the switch, the microcontroller will receive 0.
You can turn on the “Show on/off labels” radio button (This is optional).
After that click on Save.
In a similar way, you can add multiple widgets in the Web Dashboard as per your requirement.
Install Blynk IoT app to set up Mobile Dashboard
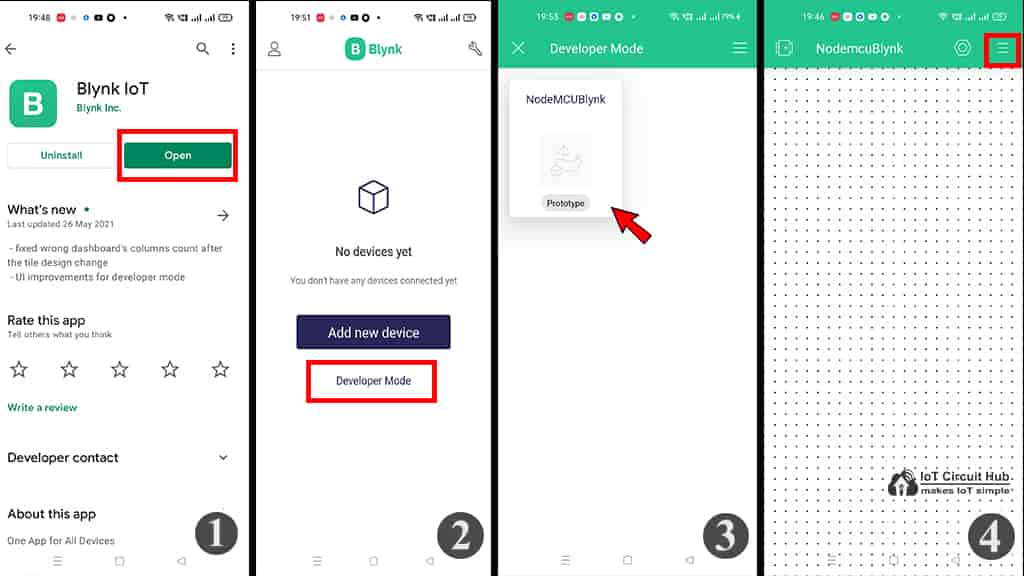
Steps to install the Blynk IoT App
1. Install the new Blynk IoT app from Google Play Store or App Store. Then log in to the Blynk IoT Platform.
2. Tap on the Developer Mode.
3. Tap on the template which you have already made in Blynk cloud.
4. Now tap on the 3-dash icon (on the right) to add widgets.
Add widgets in Blynk IoT Mobile Dashboard
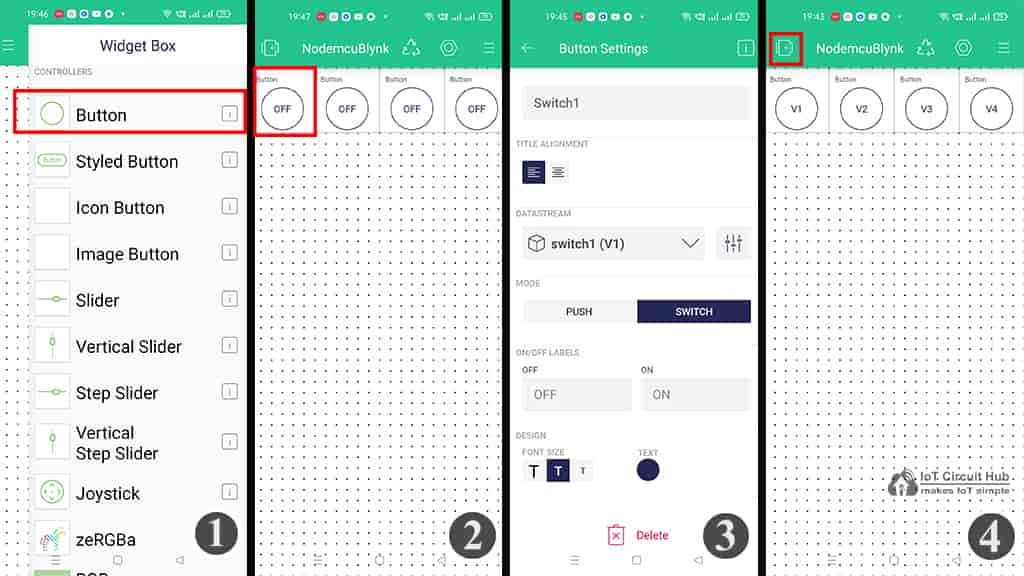
Steps to add widgets in Blynk IoT Mobile Dashboard
1. Tap on the 3-dash icon to open the Widget Box and select the widget as per requirement. Here I have selected Button.
2. Then tap on the widget to go to the settings.
3. In the settings, enter the name, select the Datastream, Mode will be Switch. Then exit from the widget.
4. After setting all the widgets tap on the exit button on the top.
Now both the Web dashboard and Mobile Dashboard of the Blynk IoT platform is ready. So we can program the microcontroller with Arduino IDE.
Program the ESP8266 or ESP32 with Blynk Examples
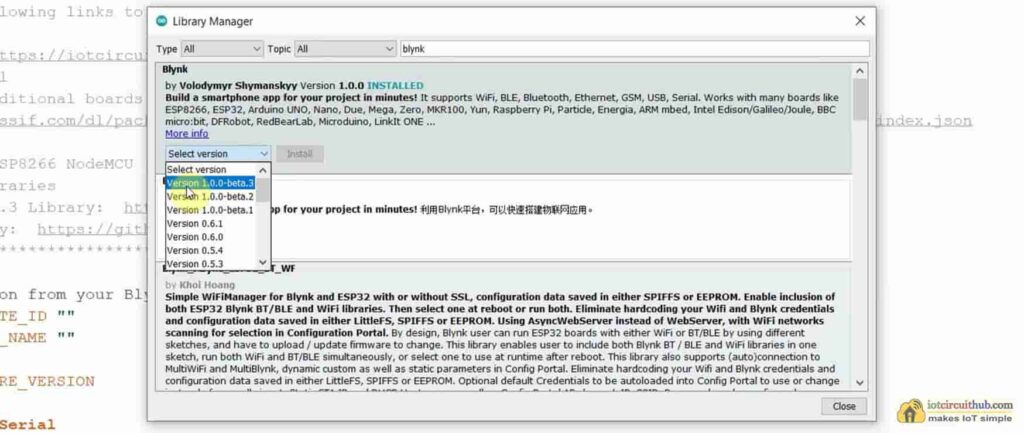
How to install the new Blynk Library for Arduino IDE?
In Arduino IDE go to Sketch — Include Library — Manage Libraries to open the Library manager. Then search for Blynk in the search box. Then click on Install to install the Blynk Library (Current version 1.0.0-beta.3). After that, you can access all the Blynk Edgent examples code for ESP8266 and ESP32 from File — Examples — Blynk — Blynk.Edgent path.
Or you can also visit the Blynk GitHub Page to download the latest Blynk Library and install it from Sketch — Include Library — Add .ZIP Library path in Arduino IDE.
Blynk Example for ESP8266 and ESP32
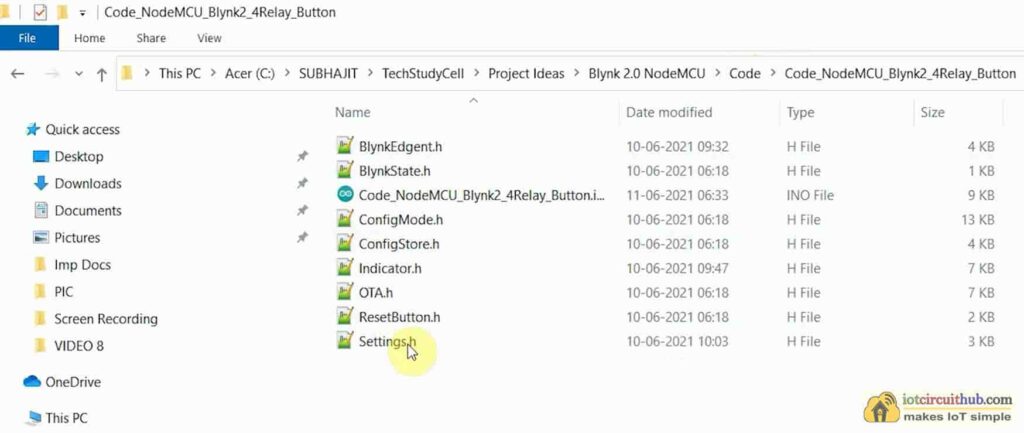
For any projects, in the new Blynk IoT platform, you will get all these files along with the .ino file (total 10 files). You have to keep all these files in the same folder.
Now open the .ino file in Arduino IDE.
In the code, you just have to update the BLYNK_TEMPLATE_ID and BLYNK_DEVICE_NAME.
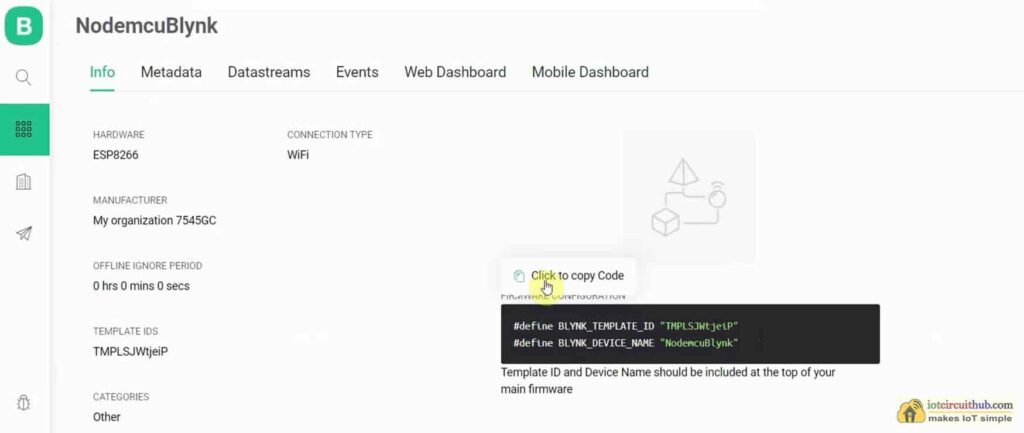
How to get the BLYNK TEMPLATE ID and BLYNK DEVICE NAME
Go to your Blynk IoT Cloud account and select the template. In the template go to the Info tab. On the right side, you will find the BLYNK_TEMPLATE_ID and BLYNK_DEVICE_NAME for that template. Click on “Click to copy code”, then go to Arduino IDE and paste it into the code.

Now you can upload the code to ESP8266 or ESP32. You don’t have to hard code the Wi-Fi credentials in the code.
After uploading the code, you have to update the Wi-Fi credentials through OTA.
Then you can control the ESP8266 or ESP32 from Blynk IoT App and Web Dashboard from anywhere in the world.
If you face any issues you can always let us know and please share your feedback with us.
Thank you for your time.

