In this ESP8266 tutorial, I have shown how to program ESP01 with Arduino Uno using the Arduino IDE. In this article, I have explained all the steps of ESP8266 programming, how to connect ESP8266 to Arduino UNO. I have also explained how to use FTDI232 USB to TTL as an ESP01 programmer with the circuit diagram.
Table of Contents
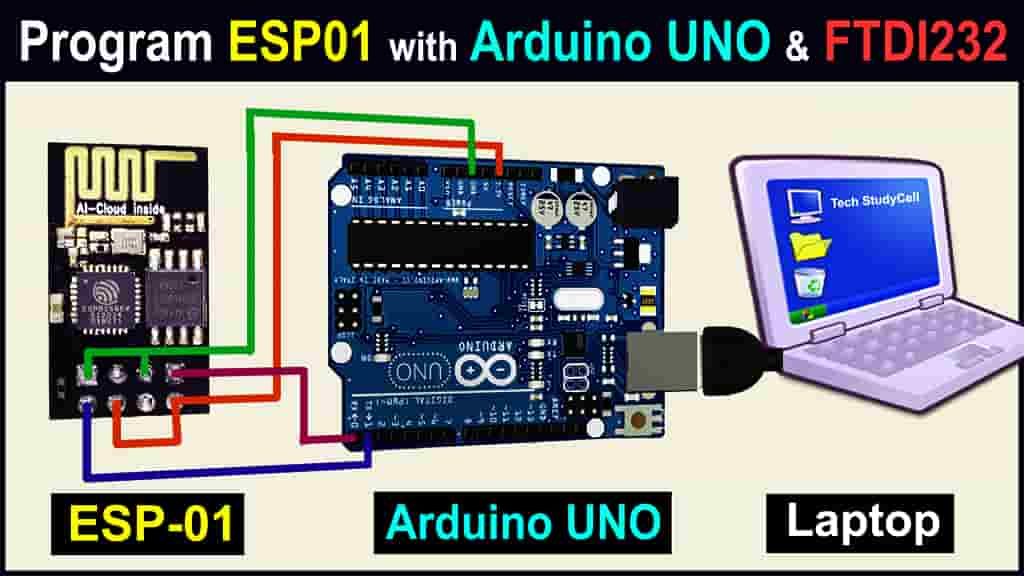
Connect ESP8266 to Arduino UNO

First, refer to this circuit to connect the ESP01 with Arduino UNO to program ESP-01.
The GPIO-0 and GND pin should be connected during programming the ESP8266.
Download ESP8266 Board in Arduino IDE

First, update the Preferences –> Aditional boards Manager URLs: https://dl.espressif.com/dl/package_esp32_index.json, http://arduino.esp8266.com/stable/package_esp8266com_index.json
Then download and install the ESP8266 board from Tools — Board Manager.
Upload the Code to ESP-01 module

Select the Board: “Generic ESP8266 Module” and the proper PORT from the Tools menu in Arduino IDE.
Then click on the Upload button.
During uploading the code when you see the “Connecting….__” text, then press the RESET button of ESP 01. (Please refer to the above picture)
After that, the code will start uploading to ESP01. During this time you will notice the TX and RX LED of Arduino IDE is blinking.
Disconnect Arduino from ESP-01

Here, I have uploaded a simple blink example sketch to ESP8266.
I have disconnected TX and RX pin from Arduino. Also, disconnect GPIO-0 from the GND pin.
Then restart the ESP-01 or you can also press the RESET button of ESP01.
As per the code, I uploaded, the LED connected with GPIO-0 starts blinking.
Here I have used Arduino UNO just to give the 3.3V supply to the ESP-01 module.
Error in ESP8266 programming

While uploading the code to ESP8266, you may get this error “esptool.FatalError. Failed to start Stub. Unexpected Response: b’OHA’ “.
To resolved the esptool.FatalError please do the following steps:
- Disconnect the supply from the ESP-01 module.
- Check the GPIO-0 and GND pin is Connected.
- Connect Arduino and ESP01 as per the circuit (refer pic 1)
- After selecting Board and Port click on the Upload button.
- During uploading the code if “Connecting….___” text appears then press the RESET button of ESP8266 ESP01 until the code start uploading.
Tutorial video on ESP8266 Programming
In the tutorial video, I have shown the ESP8266 programming in steps, also discussed some errors related to the ESP8266 program.

Also explained how upload the Blynk ESP8266 example sketch to control home appliances from smartphone.
FTDI232 as ESP01 Programmer

You can also use the FTDI232 USB to TTL converter to program the generic ESP8266 module.

I hope you like this article on the ESP8266 programming with Arduino IDE
Click Here for more such ESP8266 projects.
Please do share your feedback on this article. Thank you for your time.


