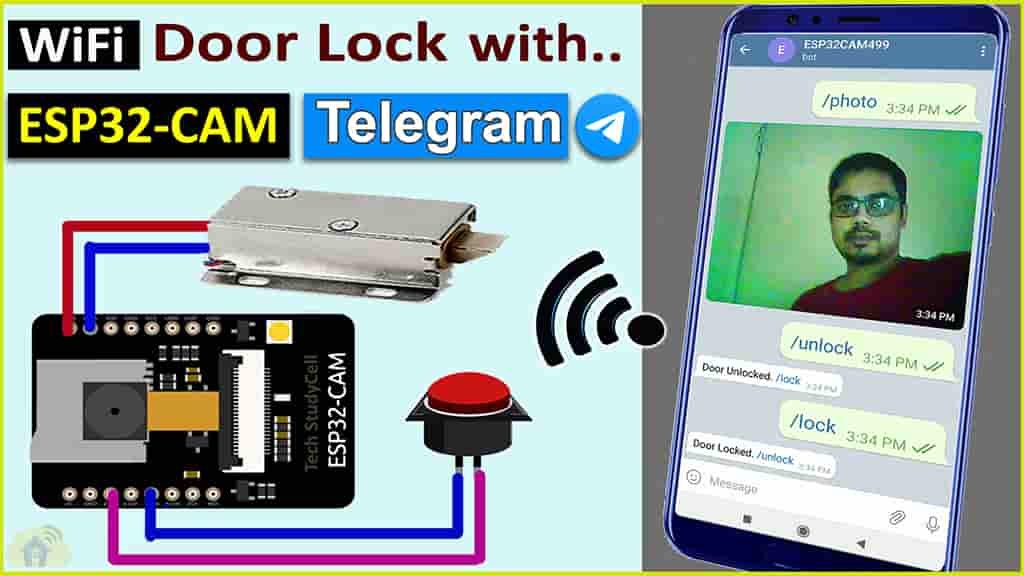
In this ESP32 CAM project, I have explained how to make WiFi door lock with photo capture using ESP32-CAM and Telegram app. With this IoT project you can take multiple photo, unlock and lock the door from anywhere in the world with the Telegram app.

When anyone presses the doorbell, you will get a notification in the telegram app with a photo of that person. After that, you can easily unlock and lock the door from the telegram app.

So this IoT project also can be used as a home security system. In this article, I have explained all the steps to make this WiFi door lock with photo capture.
Table of Contents
Circuit of ESP32 CAM WiFi Door Lock

This circuit is very simple. the input voltage is 12V DC. I have used 7805 5V regulator to feed 5V to ESP32 camera module.
I have used a TIP122 NPN transistor to control the 12V electronic lock from the GPIO12 pin and the push button is connected with the GPIO13 of ESP32-CAM. As I have used the INPUT_PULLUP function in code, so I have not used any pulled up resistor.
You can use a heatsink with the 7805 voltage regulator.
Required Components for the ESP32 CAM project
- ESP32-CAM board
- 12V Electronic Lock
- TIP122 NPN Transistor
- 7805 5V regulator
- 1N4007 diode
- 1k 0.25-watt Resistor
- 10k 0.25-watt Resistor
- 100uF 25V DC Capacitor
- Push Switch
- 12V DC supply
Tutorial video on WiFi Door Lock
In this tutorial video, I have explained how to make this ESP32-CAM Telegram WiFi door lock in detail. I have also explained the source code for this ESP32 CAM project. So please watch the complete video for a better understanding.
Configure the Telegram App for WiFi Lock
First, you have to configure the Telegram App for this ESP32-CAM project. Please follow the steps to create a new BOT in the Telegram app for this project.
Download and Install the Telegram App

First, download and install the Telegram app from Google Play Store or App Store. Then create an account.
Create a New BOT in Telegram App

1) Search for BotFather in Telegram.
2) Tap on START.
3) Type /newbot and press enter.
4) Now, give a name for the BOT. The Name should be unique.
5) Then, enter a unique username. It should end with BOT.
6) Now, note the bot token marked in the red box. It will be required in the code.
Get the User Id in Telegram App

1) Search for IDBot in Telegram
2) Tap on START.
3) Tap on the /getid in IDBot.
4) You will get the User ID.
5) Note the User ID. It will be required in the code.
Thus you can create the Bot for this ESP32 project.
Program ESP32-CAM with Arduino IDE

Here, I have used FTDI232 to program the ESP32 camera module. You can also use Arduino UNO to program ESP32CAM. Click Here for the detailed article.
During uploading the code the GPIO-0 and GND pin of ESP32-CAM should be connected.

For this ESP32-CAM project, I have used the UniversalTelegramBot library. So first you have to download and install it.
Click Here to download UniversalTelegramBot library.
Click Here to download ArduinoJson library.
Code for this ESP32 CAM project
/**********************************************************************************
 *  TITLE: ESP32CAM Telegram WiFi Door Lock with photo capture
 *  Click on the following links to learn more.
 *  YouTube Video: https://youtu.be/11V2ZzHpW3Q
 *  Related Blog : https://iotcircuithub.com/esp32-cam-telegram-wifi-door-lock
 *  by Tech StudyCell
 *  Preferences--> Aditional boards Manager URLs :
 *  https://dl.espressif.com/dl/package_esp32_index.json, http://arduino.esp8266.com/stable/package_esp8266com_index.json
 *
 *  Download Board ESP32 : https://github.com/espressif/arduino-esp32
 *  Download the libraries
 *  Brian Lough's Universal Telegram Bot Library: https://github.com/witnessmenow/Universal-Arduino-Telegram-Bot
 **********************************************************************************/


#include <WiFi.h>
#include <WiFiClientSecure.h>
#include "soc/soc.h"
#include "soc/rtc_cntl_reg.h"
#include "esp_camera.h"
#include <UniversalTelegramBot.h>
#include <ArduinoJson.h>

// Replace with your network credentials
const char* ssid = "";  //WiFi Name
const char* password = "";  //WiFi Password

// Use @myidbot to find out the chat ID of an individual or a group
// You need to click "start" on a bot before it can message you
// Initialize Telegram BOT
String chatId = "XXXXXXXXXX";
String BOTtoken = "XXXXXXXXXX:XXXXXXXXXXXXXXXXXXXXXXXXXXXXXXXXXXX";

bool sendPhoto = false;

WiFiClientSecure clientTCP;

UniversalTelegramBot bot(BOTtoken, clientTCP);

// Define GPIOs
#define BUTTON 13
#define LOCK 12
#define FLASH_LED 4

//CAMERA_MODEL_AI_THINKER
#define PWDN_GPIO_NUM     32
#define RESET_GPIO_NUM    -1
#define XCLK_GPIO_NUM      0
#define SIOD_GPIO_NUM     26
#define SIOC_GPIO_NUM     27

#define Y9_GPIO_NUM       35
#define Y8_GPIO_NUM       34
#define Y7_GPIO_NUM       39
#define Y6_GPIO_NUM       36
#define Y5_GPIO_NUM       21
#define Y4_GPIO_NUM       19
#define Y3_GPIO_NUM       18
#define Y2_GPIO_NUM        5
#define VSYNC_GPIO_NUM    25
#define HREF_GPIO_NUM     23
#define PCLK_GPIO_NUM     22


int lockState = 0;
String r_msg = "";

const unsigned long BOT_MTBS = 1000; // mean time between scan messages
unsigned long bot_lasttime; // last time messages' scan has been done

void handleNewMessages(int numNewMessages);
String sendPhotoTelegram();

String unlockDoor(){
 if (lockState == 0) {
  digitalWrite(LOCK, HIGH);
  lockState = 1;
  delay(100);
  return "Door Unlocked. /lock";
 }
 else{
  return "Door Already Unlocked. /lock";
 }
}
String lockDoor(){
 if (lockState == 1) {
  digitalWrite(LOCK, LOW);
  lockState = 0;
  delay(100);
  return "Door Locked. /unlock";
 }
 else{
  return "Door Already Locked. /unlock";
 }
}

String sendPhotoTelegram(){
  const char* myDomain = "api.telegram.org";
  String getAll = "";
  String getBody = "";

  camera_fb_t * fb = NULL;
  fb = esp_camera_fb_get();
  if(!fb) {
    Serial.println("Camera capture failed");
    delay(1000);
    ESP.restart();
    return "Camera capture failed";
  }

  Serial.println("Connect to " + String(myDomain));

  if (clientTCP.connect(myDomain, 443)) {
    Serial.println("Connection successful");

   Serial.println("Connected to " + String(myDomain));

    String head = "--IotCircuitHub\r\nContent-Disposition: form-data; name=\"chat_id\"; \r\n\r\n" + chatId + "\r\n--IotCircuitHub\r\nContent-Disposition: form-data; name=\"photo\"; filename=\"esp32-cam.jpg\"\r\nContent-Type: image/jpeg\r\n\r\n";
    String tail = "\r\n--IotCircuitHub--\r\n";

    uint16_t imageLen = fb->len;
    uint16_t extraLen = head.length() + tail.length();
    uint16_t totalLen = imageLen + extraLen;

    clientTCP.println("POST /bot"+BOTtoken+"/sendPhoto HTTP/1.1");
    clientTCP.println("Host: " + String(myDomain));
    clientTCP.println("Content-Length: " + String(totalLen));
    clientTCP.println("Content-Type: multipart/form-data; boundary=IotCircuitHub");
    clientTCP.println();
    clientTCP.print(head);

    uint8_t *fbBuf = fb->buf;
    size_t fbLen = fb->len;
    for (size_t n=0;n<fbLen;n=n+1024) {
      if (n+1024<fbLen) {
        clientTCP.write(fbBuf, 1024);
        fbBuf += 1024;
      }
      else if (fbLen%1024>0) {
        size_t remainder = fbLen%1024;
        clientTCP.write(fbBuf, remainder);
      }
    }

    clientTCP.print(tail);

    esp_camera_fb_return(fb);

    int waitTime = 10000;   // timeout 10 seconds
    long startTimer = millis();
    boolean state = false;

    while ((startTimer + waitTime) > millis()){
      Serial.print(".");
      delay(100);
      while (clientTCP.available()){
          char c = clientTCP.read();
          if (c == '\n'){
            if (getAll.length()==0) state=true;
            getAll = "";
          }
          else if (c != '\r'){
            getAll += String(c);
          }
          if (state==true){
            getBody += String(c);
          }
          startTimer = millis();
       }
       if (getBody.length()>0) break;
    }
    clientTCP.stop();
    Serial.println(getBody);
  }
  else {
    getBody="Connected to api.telegram.org failed.";
    Serial.println("Connected to api.telegram.org failed.");
  }
  return getBody;
}

void handleNewMessages(int numNewMessages){
  Serial.print("Handle New Messages: ");
  Serial.println(numNewMessages);

  for (int i = 0; i < numNewMessages; i++){
    // Chat id of the requester
    String chat_id = String(bot.messages[i].chat_id);
    if (chat_id != chatId){
      bot.sendMessage(chat_id, "Unauthorized user", "");
      continue;
    }

    // Print the received message
    String text = bot.messages[i].text;
    Serial.println(text);

    String fromName = bot.messages[i].from_name;
    if (text == "/photo") {
      sendPhoto = true;
      Serial.println("New photo request");
    }
    if (text == "/lock"){
      String r_msg = lockDoor();
      bot.sendMessage(chatId, r_msg, "");
    }
    if (text == "/unlock"){
      String r_msg = unlockDoor();
      bot.sendMessage(chatId, r_msg, "");
    }
    if (text == "/start"){
      String welcome = "Welcome to the ESP32-CAM Telegram Smart Lock.\n";
      welcome += "/photo : Takes a new photo\n";
      welcome += "/unlock : Unlock the Door\n\n";
      welcome += "/lock : Lock the Door\n";
      welcome += "To get the photo please tap on /photo.\n";
      bot.sendMessage(chatId, welcome, "Markdown");
    }
  }
}

void setup(){
  WRITE_PERI_REG(RTC_CNTL_BROWN_OUT_REG, 0);
  Serial.begin(115200);
  delay(1000);

  pinMode(LOCK,OUTPUT);
  pinMode(FLASH_LED,OUTPUT);
  pinMode(BUTTON,INPUT_PULLUP);

  digitalWrite(LOCK, LOW);

  WiFi.mode(WIFI_STA);
  Serial.println();
  Serial.print("Connecting to ");
  Serial.println(ssid);
  WiFi.begin(ssid, password);
  clientTCP.setCACert(TELEGRAM_CERTIFICATE_ROOT);
  while (WiFi.status() != WL_CONNECTED) {
    Serial.print(".");
    delay(500);
  }
  Serial.println();
  Serial.print("ESP32-CAM IP Address: ");
  Serial.println(WiFi.localIP());

  camera_config_t config;
  config.ledc_channel = LEDC_CHANNEL_0;
  config.ledc_timer = LEDC_TIMER_0;
  config.pin_d0 = Y2_GPIO_NUM;
  config.pin_d1 = Y3_GPIO_NUM;
  config.pin_d2 = Y4_GPIO_NUM;
  config.pin_d3 = Y5_GPIO_NUM;
  config.pin_d4 = Y6_GPIO_NUM;
  config.pin_d5 = Y7_GPIO_NUM;
  config.pin_d6 = Y8_GPIO_NUM;
  config.pin_d7 = Y9_GPIO_NUM;
  config.pin_xclk = XCLK_GPIO_NUM;
  config.pin_pclk = PCLK_GPIO_NUM;
  config.pin_vsync = VSYNC_GPIO_NUM;
  config.pin_href = HREF_GPIO_NUM;
  config.pin_sscb_sda = SIOD_GPIO_NUM;
  config.pin_sscb_scl = SIOC_GPIO_NUM;
  config.pin_pwdn = PWDN_GPIO_NUM;
  config.pin_reset = RESET_GPIO_NUM;
  config.xclk_freq_hz = 20000000;
  config.pixel_format = PIXFORMAT_JPEG;

  //init with high specs to pre-allocate larger buffers
  if(psramFound()){
    config.frame_size = FRAMESIZE_UXGA;
    config.jpeg_quality = 10;  //0-63 lower number means higher quality
    config.fb_count = 2;
  } else {
    config.frame_size = FRAMESIZE_SVGA;
    config.jpeg_quality = 12;  //0-63 lower number means higher quality
    config.fb_count = 1;
  }

  // camera init
  esp_err_t err = esp_camera_init(&config);
  if (err != ESP_OK) {
    Serial.printf("Camera init failed with error 0x%x", err);
    delay(1000);
    ESP.restart();
  }

  // Drop down frame size for higher initial frame rate
  sensor_t * s = esp_camera_sensor_get();
  s->set_framesize(s, FRAMESIZE_CIF);  // UXGA|SXGA|XGA|SVGA|VGA|CIF|QVGA|HQVGA|QQVGA
}

void loop(){

  if (sendPhoto){
    Serial.println("Preparing photo");
    digitalWrite(FLASH_LED, HIGH);
    delay(200);
    sendPhotoTelegram();
    digitalWrite(FLASH_LED, LOW);
    sendPhoto = false;
  }


  if(digitalRead(BUTTON) == LOW){
    Serial.println("Preparing photo");
    digitalWrite(FLASH_LED, HIGH);
    delay(200);
    sendPhotoTelegram();
    digitalWrite(FLASH_LED, LOW);
    sendPhoto = false;
  }

  if (millis() - bot_lasttime > BOT_MTBS)
  {
    int numNewMessages = bot.getUpdates(bot.last_message_received + 1);

    while (numNewMessages)
    {
      Serial.println("got response");
      handleNewMessages(numNewMessages);
      numNewMessages = bot.getUpdates(bot.last_message_received + 1);
    }
    bot_lasttime = millis();
  }
}
Before uploading the code, you have to enter the following details.
// Replace with your network credentials
const char* ssid = "WiFi Name";
const char* password = "WiFi Password";
Enter the WiFi name and password.
// Initialize Telegram BOT
String chatId = "XXXXXXXXXX"; //User ID
String BOTtoken = "XXXXXXXXXX:XXXXXXXXXXXXXXXXXXXXXXXXXXXXXXXXXXX";
Enter the User Id and Bot token you have received from the IDBot and BotFather in Telegram App.
If you refer to the same circuit, then after doing this changes, you can directly upload the code to ESP32-CAM.

During uploading the code, if you see the “Connecting…..______” text, then press the RESET button. Then the code will start uploading.
After uploading the code, disconnect the GPIO-0 from GND pin.

Then open the serial monitor and set the Baud Rate at 115220.
Now, press the reset button of ESP32CAM. If the WiFi is connected successfully then it will print the local IP address.

Now, connect the ESP32CAM with the circuit. and give the 12V DC supply.
Then search for the Bot you have created and tap on START.
If the BOT is connected with ESP32CAM, you will get following message.
Testing the ESP32 CAM WiFi Lock

Now, press the pushbutton, the ESP32CAM will capture the photo and send it to telegram app.

If you tap on the /photo, then ESP32CAM will again take the photo and send it to telegram app.

After that tap on the /unlock to unlock the door then tap on /lock to lock the door again.
This is a very useful IoT project for home security systems. As you can control the door lock and capture the photo from anywhere in the world through the internet.
Click Here for more such ESP32 projects.
Please do share your feedback on this IoT project. Thank you for your time.

