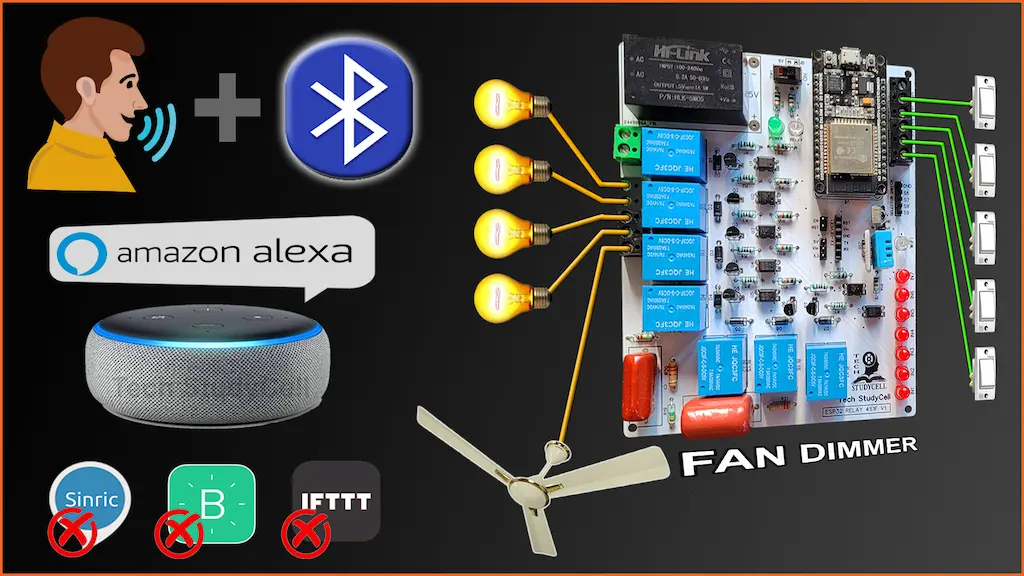
In this Internet of Things project, I have explained how to make a practical IoT-based Amazon Echo Home Automation system with a fan dimmer using ESP32, ESPAlexa library, and Bluetooth.

You don’t need any third-party IoT applications to make this IoT project, you just need an echo device and ESP32.

With this ESP32 project, you can also control appliances, and fan speed without internet from Bluetooth app, IR remote, and manual switches.

So if you follow all the steps, you can easily make this home automation using ESP32 and Amazon Alexa app.
Table of Contents
Required Components for the ESP32 IoT project

- ESP32 DevKIT V1 Amazon
- 8-channel 5V SPDT Relay Module Amazon
- HC-05 Bluetooth Module
- TSOP1838 IR Receiver (with metallic case) Amazon
- Switches
- Any IR Remote
- 4-step Fan Regulator OR (2.2uf & 3.3uf 250V Capacitor, 2.2-ohm 1/2W Resistors, 220k 1/4W Resistors, and 4-step selector switch)
- Amazon Echo Device
Circuit of the ESP32 Alexa IoT Project

The circuit is very simple, I have used D23, D22, D21 & D19 GPIO to control the first 4 relays. And D18, D5 & D25 control the next 3 relays to control the fan speed.
GPIO D13, D12, D14, D27 & D26 are connected with switches, and GPIO D33, D32, D15 & D4 are connected with a 4-step selector switch to control the relay module manually.
I have used the INPUT_PULLUP function in Arduino IDE instead of using the pull-up resistors with each push button.
As per the source code, when the control pins of the relay module receive a LOW signal the relay will turn on and the relay will turn off for the HIGH signal in the control pin.
The TX pin of the Bluetooth or BLE module is connected to the RX2 (GPIO16) pin of ESP32 for serial communication.
IR remote receiver (TSOP1838) connected with D35.
I have used a 5V 5Amp mobile charger to supply the circuit.
Please take proper safety precautions while connecting the AC appliances.
**I have not used the inbuilt Bluetooth of ESP32 as the total size of the sketch is bigger than ESP32 flash memory.

Tutorial video on Alexa ESP32 IoT Project
In the Internet of Things tutorial video, I have covered the following steps in detail.
- Add devices to the Amazon Alexa App using the ESPAlexa library
- Connect ESP32 with the Bluetooth app.
- Control fan speed with Alexa and Bluetooth app.
- Circuit of the home automation system using ESP32.
- Explained the source code of the ESP32 IoT project.
PCB for this ESP32 Home Automation system
To make the circuit compact, I have designed a PCB for this ESP32 Blynk IoT project.
If you want to buy this complete project (Rs: 3399/), then please send an email to [email protected] with your address.
(Including pre-programmed ESP32, DHT11 sensor, IR receiver, 1 selector Switch, IR remote)


If you want, you can also use this PCB to make the circuit compact and give the project a professional look. This PCB can be used for any ESP32 Home Automation project.
Required components for the PCB

Program ESP32 with Arduino IDE
For this IoT-based home automation project, I have used the Arduino IDE to program ESP32.
First update the Preferences –> Aditional boards Manager URLs: https://raw.githubusercontent.com/espressif/arduino-esp32/gh-pages/package_esp32_dev_index.json, http://arduino.esp8266.com/stable/package_esp8266com_index.json
- Then install the ESP32 board from the Board manager or Click Here to download the ESP32 board.
- Download the required libraries from the following links:
Source Codes for EspAlexa Project using ESP32
Click on the following buttons to download the source codes for this ESP32 project.
First, you have to upload the Code for Getting HEX codes to ESP32 and connect the IR receiver with GPIO D35.


After that, open the serial monitor, and select the Baud Rate at 115200.
Now, you have to press all the remote buttons (one by one) which you want to use to control the relays.
Now, save all the HEX codes. You have to update the main code with these HEX codes. You need 9 HEX codes for this ESP32 project.
In the main sketch, you have to update WiFi Credentials
// WiFi Credentials
const char* ssid = "";
const char* password = "";
Enter the device names (Alexa will identify the device with these names)
// device names
String Device_1_Name = "Night Lamp";
String Device_2_Name = "Room Light";
String Device_3_Name = "Studio Light";
String Device_4_Name = "Toilet Light";
String Device_5_Name = "Fan";
Update the HEX code of the IR Remote buttons (as shown in the tutorial video).
//Update the HEX code of IR Remote buttons 0x<HEX CODE>
#define IR_Button_1   0x1FEE01F
#define IR_Button_2   0x1FE10EF
#define IR_Button_3   0x1FE906F
#define IR_Button_4   0x1FE50AF
#define IR_Button_5   0x1FED827
#define IR_Fan_Up     0x1FE609F
#define IR_Fan_Down   0x1FEA05F
#define IR_All_On     0x1FE807F
#define IR_All_Off    0x1FE48B7
In the code, I have used Preferences.h library to remember the last states of all the GPIO connected with relays. Please refer to the following article on the ESP32 Preferences library.
After doing these changes, go to Tools and select the board as “DOIT ESP32 DEVKIT V1” and the proper PORT in Arduino IDE.
Then click on the upload button to program the ESP32 board.
Configure Amazon Alexa App

In the tutorial video, I have explained all the steps to add devices to the Amazon Alexa App.
While configuring the Amazon Alexa App, the ESP32, Amazon Echo Dot and the smartphone should be connected to same the wifi network.
Once the Alexa App finds all the devices, you can control those devices with voice commands using the Alexa Echo Dot.

You may face No new devices found error while adding the devices with Alexa.
Then restart the echo dot, after restarting, once the echo dot connects with the same WiFi, tap on “Try discovery again”.
Connect ESP32 with Bluetooth App
I have made a Bluetooth app in MIT app inventor for this IoT-based home automation project.

I have explained the steps to connect the ESP32 with the Bluetooth app in the tutorial video. You also control fan speed with this Bluetooth app.
Connect Appliances and switches with the PCB

Please refer to the above circuit diagram to connect all the AC appliances and switches with the PCB.
Please take proper safety precautions while connecting the AC appl
Control Fan Speed with Amazon Alexa App

Control the speed of the ceiling fan from anywhere in the world with Alexa. If the WiFi is connected, you can also monitor the real-time feedback in the Amzon Alexa App.
Control Fan Speed with IR Remote & Selector Switch


You can use any IR remote to control the fan speed. I have used 2 buttons to increase and decrease the fan speed from the IR remote.
You can also use a selector switch to control the fan speed manually if the WiFi is not connected.
Control relays with Alexa App, Bluetooth, IR Remote & Switch
You can control appliances with the Amazon Alexa app from anywhere in the world through the internet.
If the ESP32 is connected to WiFi, then you can also monitor the real-time feedback in the Amazon Alexa app.

You can use any IR remote to control the appliances.
First, get the HEX codes of unused IR Remote buttons, then update the HEX codes in the code.
If the Wi-Fi is not connected, still you can control relays with the IR remote.

You can also connect the ESP32 with Bluetooth and control the appliances with Bluetooth App.
If the ESP32 is connected to Wi-Fi then it will send real-time feedback to the Amazon Alexa App.

You can also control the appliances with manual switches.
If the ESP32 is connected to Wi-Fi then it will send real-time feedback to the Amazon Alexa App.
I hope you like this IoT-based home automation system idea with ESP32 and Amazon Echo Dot.
Click Here for more such ESP32 projects.
Please do share your feedback on this IoT project. Thank you for your time.


