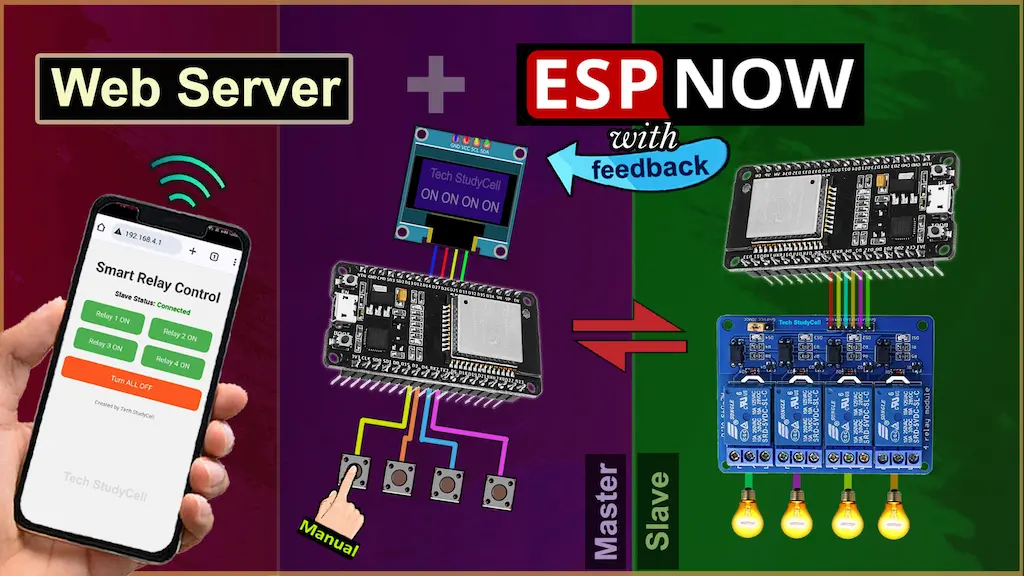
In this project, we demonstrate how to build a reliable and wireless home automation system using two ESP32 boards. One acts as the ESP-NOW master, and the other as the ESP-NOW slave. You can control 4 relays wirelessly via ESP-NOW protocol, and also monitor and control them from a built-in web server interface hosted in Access Point (AP) mode on the master ESP32. An OLED display provides real-time feedback on relay states, and an onboard LED indicates slave connectivity.

Table of Contents
Project Features
- ESP-NOW Master-Slave Communication: Reliable peer-to-peer wireless control between two ESP32s.
- Web Server Dashboard: Hosted on the master ESP32 to control relays using a smartphone or computer.
- OLED Display Feedback: Displays current relay status and connection info.
- Manual Hardware Control: Push buttons are used on both the master and slave for local control.
- Real-Time Feedback: Slave sends back relay states after each command.
- Slave Connection Indicator: Master’s onboard LED turns on/off based on slave connectivity.
Tutorial Video on ESP32 ESP-NOW Project
Why Use ESP-NOW?
ESP-NOW is a low-power, low-latency, connectionless communication protocol developed by Espressif. It allows ESP32 boards to communicate directly without using a Wi-Fi router or internet. This makes it ideal for offline automation, remote sensing, and fast device-to-device control in a smart home and automation systems.
ESP-NOW Communication Range (Master-Slave Distance)
The range between the ESP32 master and slave depends on several factors like power level, antenna quality, physical obstructions, and interference.
Typical Range Estimates:
| Environment | Estimated Range |
|---|---|
| Indoor (with walls) | 20 to 50 meters (65 to 164 feet) |
| Open Line of Sight (no obstacles) | 100 to 150 meters (328 to 492 feet) |
| With External Antenna ESP32 | Up to 250+ meters (820+ feet) |
Factors That Affect Range:
- Walls and obstacles (especially concrete or metal)
- Interference from Wi-Fi routers, Bluetooth, or microwave ovens
- Power supply stability
- Type of ESP32 board (some have ceramic antennas, others support external antennas)

Extended Control Range via Web Server
This project features a built-in web server on the ESP32 master, allowing relay control from a mobile device over Wi-Fi. This extends the effective control range beyond ESP-NOW’s limit, as long as the mobile stays connected to the master’s Wi-Fi network.
Required Components
- ESP32 DevKIT V1 Amazon 2 qty
- 4-channel 5V SPDT Relay Module (Active Low) Amazon
- Push Buttons 8 qty
- SSD1306 OLED Display (I2C)
- Jumper Wires
- Breadboard or PCB
Circuit of the ESP32 ESPNOW Relay project
- Master ESP32: Has 4 push buttons to send commands using ESP-NOW and receives feedback to update OLED.
- Slave ESP32: Controls 4 relays, receives commands, and sends feedback to the Master. It also has 4 manual control buttons for local operation.
Master ESP32 Circuit

In the master circuit, GPIO D13, D12, D14, & D27 are connected with push buttons to control relays in the slave circuit.
I have used the INPUT_PULLUP function in Arduino IDE instead of using the pull-up resistors with each push button.
For the OLED, I have used GPIO 21 for SDA and GPIO 22 for SCL pin (I2C).
I have used GPIO 2 (Inbuilt LED) for slave connection indication.
Slave ESP32 Circuit

In the slave circuit, I have used D23, D19, D18 & D5 GPIO pins to control the 4-channel relay module.
The GPIO D13, D12, D14, & D27 are connected with push buttons to control the relay module manually.
I have used the INPUT_PULLUP function in Arduino IDE instead of using the pull-up resistors with each push button.
As per the source code, when the control pins of the relay module receive a LOW signal, the relay will turn on, and the relay will turn off for the HIGH signal in the control pin.
I have used a 5V 5A mobile charger to supply the circuit.
Please take proper safety precautions while connecting the AC appliances.

🎉 PCBWay is celebrating 11 years of innovation and partnership! Join the anniversary event from June 18 to July 18, 2025, unlock cards through simple activities, and get a chance to win exciting rewards. Let’s build a greener, smarter future together! Visit PCBWay
🔓 Event Rules: Complete any of the 6 simple activities — like reading their anniversary letter, watching a promo video, placing an order, or uploading your project — to unlock cards. Collect all 6 cards to receive one extra lucky draw entry!
Celebrate the journey, unlock rewards, and be a part of the future of electronics with PCBWay! Explore Now
Program ESP32 with Arduino IDE
In the tutorial video, I have explained all the steps to program the ESP32 using Arduino IDE.
- Update the Preferences –> Aditional boards Manager URLs: https://dl.espressif.com/dl/package_esp32_index.json, http://arduino.esp8266.com/stable/package_esp8266com_index.json
- Then install the ESP32 board from the Board Manager, or Click Here to download the ESP32 board (version 3.2.0).
- Download the required libraries from the following links:
- AceButton version 1.10.1.
- Adafruit_SSD1306 version 2.5.13.
- Adafruit Unified Sensor version 1.1.15.
Source Codes for the ESP32 ESP-NOW project
First, you have to get the MAC addresses of both the master and slave ESP32.
Steps to Get ESP32 MAC Address
- Upload the code (Code_ESP32_Get_MAC_Address_ESPNOW.ino) to the ESP32.
- Open Serial Monitor (set baud rate to 115200).
- Press the RESET button on the ESP32.
- The MAC address will be printed in the Serial Monitor

Here, you need to enter the Slave ESP32’s MAC address in the Master’s code, and the Master’s MAC address in the Slave’s code.
Master ESP32 Code Guide
This ESP32 Master code enables wireless control and monitoring of 4 relays via ESP-NOW and a built-in web interface. It sends toggle commands to the Slave, receives feedback, displays relay states on an OLED, and offers both physical button and web-based control.
Here’s a concise table summary of what the ESP32 Master code does:
| Feature | Functionality |
|---|---|
| ESP-NOW Send | Sends relay toggle commands to Slave (via buttons or web interface). |
| ESP-NOW Receive | Receives relay state feedback from Slave. |
| OLED Display | Shows current relay states and connection status. |
| Built-in LED | Turns ON if feedback is received (Slave connected), OFF if not. |
| Physical Buttons | Toggles relays when released using AceButton library. |
| Web Server | Hosts a control page for toggling relays and viewing statuses. |
| HTML UI | Dynamically shows relay states and Slave status (via JSON updates every 2s). |
| JSON API | Serves current relay states and connection status to the web page. |
| Wi-Fi Mode | Acts as a SoftAP (Access Point) for web interface access. |
Here’s a detailed line-by-line explanation of the ESP32 Master code:
Libraries & Global Declarations
#include <WiFi.h>
#include <WebServer.h>
#include <esp_now.h>
#include <Wire.h>
#include <Adafruit_SSD1306.h>
#include <AceButton.h>

using namespace ace_button;
Explanation:
- These are required for WiFi AP mode, WebServer, ESP-NOW, OLED display, and AceButton (for debounced button input handling).
OLED and Pins Setup
#define SCREEN_WIDTH 128
#define SCREEN_HEIGHT 32
#define OLED_RESET -1
Adafruit_SSD1306 display(SCREEN_WIDTH, SCREEN_HEIGHT, &Wire, OLED_RESET);

#define LED_BUILTIN 2- Initializes a 128×32 OLED display.
- Defines GPIO2 as the built-in LED used to indicate slave connection.
WiFi AP Credentials
const char* ssid = "ESP32_Relay";
const char* password = "12345678";- Creates a Wi-Fi Access Point named
ESP32_Relay. - If you want, you can modify the Access Point name and password.
Buttons and States
const int buttonPins[] = {13, 12, 14, 27};
const int numButtons = 4;
bool buttonStates[numButtons] = {false, false, false, false};- Defines 4 GPIOs for physical buttons.
buttonStatestracks the ON/OFF status of each relay.
ESP-NOW Data Structures
uint8_t slaveMAC[] = {0x24, 0xD7, 0xEB, 0x14, 0xE2, 0xBC};

struct ButtonData {
  int buttonID;
  bool state;
} buttonData;

struct FeedbackData {
  bool relayStates[4];
} feedbackData;slaveMAC: MAC address of your slave ESP32. (Update the MAC address).ButtonData: Carries which button (relay) and state (ON/OFF) to be sent.FeedbackData: Stores 4 relay states received from the slave.
Connection Status and Timeout
bool slaveConnected = false;
unsigned long lastFeedbackTime = 0;
const unsigned long feedbackTimeout = 4000;- Tracks when the last feedback was received from the slave.
- If >4s pass with no feedback, → show disconnected.
AceButton Initialization
AceButton buttons[numButtons] = {
  AceButton(buttonPins[0]),
  AceButton(buttonPins[1]),
  AceButton(buttonPins[2]),
  AceButton(buttonPins[3])
};- Initializes AceButton objects for each button.
Web Server Object
WebServer server(80);- Starts an HTTP server on port 80.
HTML UI + JavaScript (JSON-based Web UI)
Let’s break it down block by block:
Function Declaration
getHTMLPage() {
  String html = "";
Starts the function which returns a complete HTML page as a string. The html variable is used to build the page piece by piece.
HTML Header + Meta + CSS Styling
  html += "<!DOCTYPE html><html><head><title>Smart Relay Control</title>";
  html += "<meta name='viewport' content='width=device-width, initial-scale=1.0'>";
Defines the document as HTML5 and sets the page to scale properly on mobile devices.
html += "<style>";Starts an inline CSS style block.
html += "body { background: #f2f2f2; font-family: Arial; text-align: center; margin: 0; padding: 20px; }";Styles the page background color, sets font, centers text, and adds padding.
html += ".grid { display: grid; grid-template-columns: repeat(2, 1fr); gap: 15px; max-width: 300px; margin: auto; }";Creates a responsive grid with 2 columns and spacing between elements.
html += ".button { padding: 15px; font-size: 16px; color: white; border: none; border-radius: 10px; cursor: pointer; }";General style for all buttons: padding, rounded corners, white text, and pointer cursor.
  html += ".on { background-color: #4CAF50; }";
  html += ".off { background-color: #f44336; }";
Different background colors for ON and OFF relay states.
html += ".turnAllOff { background-color: #FF5722; width: 100%; margin-top: 20px; }";Styling for the “Turn ALL OFF” button — full width, orange background, spacing at the top.
  html += "h1 { color: #333; margin-bottom: 20px; }";
  html += "#status { margin-bottom: 20px; font-weight: bold; }";
  html += "footer { margin-top: 30px; font-size: 12px; color: #777; }";
Styling for the page title, status message, and footer text.
html += "</style></head><body>";Ends the <style> and <head>, and begins the <body> section of the HTML.
HTML Body Content
html += "<h1>Smart Relay Control</h1>";Page heading/title.
html += "<div id='status'>Slave Status: <span id='slaveStatus' style='color: red;'>Disconnected</span></div>";Shows the slave’s connection status. Defaults to “Disconnected” in red.
html += "<div class='grid' id='buttons'></div>";Empty grid container that will hold relay buttons, dynamically populated by JavaScript.
html += "<button class='button turnAllOff' onclick='turnAllOff()'>Turn ALL OFF</button>";Button that triggers turnAllOff() function when clicked.
html += "<footer>Created by Tech StudyCell</footer>";Displays a footer credit at the bottom of the page.
JavaScript Code Begins
html += "<script>\n";Start of JavaScript code block.
JavaScript: fetchRelayStates()
  html += "function fetchRelayStates(){\n";
  html += "  fetch('/relay_states')\n";
Sends an HTTP request to the /relay_states route on the ESP32.
html += " .then(response => response.json())\n";Parses the returned JSON response.
  html += "    .then(data => {\n";
  html += "      let buttonsHTML = '';\n";
Processes the JSON data. A string buttonsHTML is prepared to build the button grid.
  html += "      data.relays.forEach((state, i) => {\n";
  html += "        buttonsHTML += `<button class='button ${state ? 'on' : 'off'}' onclick='toggleRelay(${i}, ${state ? 0 : 1})'>Relay ${i+1} ${state ? 'ON' : 'OFF'}</button>`;\n";
For each relay in the relays array:
- If
stateis 1 (ON), class isonand button showsRelay 1 ON. - If
stateis 0 (OFF), class isoffand button showsRelay 1 OFF. toggleRelay(i, newState)is called on click.
  html += "      });\n";
  html += "      document.getElementById('buttons').innerHTML = buttonsHTML;\n";
Updates the button grid with new HTML.
  html += "      document.getElementById('slaveStatus').innerText = data.slaveConnected ? 'Connected' : 'Disconnected';\n";
  html += "      document.getElementById('slaveStatus').style.color = data.slaveConnected ? 'green' : 'red';\n";
Updates the text and color of the slave status based on slaveConnected boolean.
  html += "    });\n";
  html += "}\n";
Ends the function.
JavaScript: toggleRelay()
  html += "function toggleRelay(relay, state){\n";
  html += "  fetch(`/toggle?relay=${relay}&state=${state}`)\n
Sends a request to toggle a specific relay on or off, using query parameters.
  html += "    .then(() => setTimeout(fetchRelayStates, 500));\n";
  html += "}\n";
After toggling, it waits 500 ms and refreshes the button grid to reflect the updated states.
JavaScript: turnAllOff()
  html += "function turnAllOff(){\n";
  html += "  fetch('/turn_all_off')\n";
Sends a request to the server to turn off all relays.
  html += "    .then(() => setTimeout(fetchRelayStates, 500));\n";
  html += "}\n";
Refreshes relay states after 500 ms delay.
JavaScript: Auto Refresh + OnLoad
html += "setInterval(fetchRelayStates, 2000);\n";Calls fetchRelayStates() every 2 seconds to keep the UI in sync.
html += "window.onload = fetchRelayStates;\n";Calls fetchRelayStates() once when the page loads.
Close Script and HTML Tags
  html += "</script>";
  html += "</body></html>";
  return html;
}
Closes the script, body, and HTML tags. Then returns the whole HTML page.
ESP-NOW Send Callback: onDataSent()
void onDataSent(const uint8_t *mac_addr, esp_now_send_status_t status) {This function is automatically called when the ESP32 finishes sending ESP-NOW data to the slave. It receives:
mac_addr: The MAC address of the receiver.status: Result of the transmission (ESP_NOW_SEND_SUCCESSor failure).
slaveConnected = (status == ESP_NOW_SEND_SUCCESS); // Update slave connection
If the send was successful, mark slaveConnected as true; otherwise, false.
  digitalWrite(LED_BUILTIN, slaveConnected ? HIGH : LOW); // Turn on LED if slave is connected
}
Turns the built-in LED ON if the slave is connected, OFF if not.
OLED Display Update: updateOLED()
void updateOLED() {
  display.clearDisplay();
Clears the current contents of the OLED screen.
display.setCursor(0, 0);Sets the cursor to the top-left of the screen.
  display.println("Relay States: ");
  display.println("-----------------");
Prints a heading and a separator line.
  for (int i = 0; i < 4; i++) {
    display.print(feedbackData.relayStates[i] ? "ON " : "OFF ");
  }
Loops through all 4 relays:
- Prints “ON ” if relay is on.
- Prints “OFF ” if relay is off.
  display.display();
}
Pushes all content to the OLED to make it visible.
ESP-NOW Receive Callback: onDataRecv()
void onDataRecv(const esp_now_recv_info_t *info, const uint8_t *incomingData, int len) {Triggered when the ESP32 receives data via ESP-NOW.
info: Metadata about sender.incomingData: Pointer to the actual data.len: Number of bytes received.
memcpy(&feedbackData, incomingData, sizeof(feedbackData));Copies the incoming data into feedbackData structure.
lastFeedbackTime = millis();Records the timestamp of the last valid feedback for timeout logic.
  updateOLED();
}
Updates the OLED to reflect the new relay states.
Handle Physical Button Presses: handleButtonPress()
void handleButtonPress(AceButton *button, uint8_t eventType, uint8_t buttonState) {Handles events from the AceButton library. This function is attached as a callback.
if (eventType == AceButton::kEventReleased) {Only react to button release events (not press or long press).
int pin = button->getPin();Gets the GPIO pin of the button that was released.
    for (int i = 0; i < numButtons; i++) {
      if (buttonPins[i] == pin) {
Loops through the known button pins to find which index (relay) it controls.
buttonStates[i] = !buttonStates[i];Toggles the relay state (ON -> OFF or OFF -> ON).
        buttonData.buttonID = i;
        buttonData.state = buttonStates[i];
Fills a buttonData structure with relay index and new state.
esp_now_send(slaveMAC, (uint8_t *)&buttonData, sizeof(buttonData));
Sends the toggle command to the slave via ESP-NOW.
        break;
      }
    }
  }
}
Ends all blocks.
Web UI Relay Toggle Handler: handleToggle()
void handleToggle() {
  if (server.hasArg("relay") && server.hasArg("state")) {
Checks if the URL query has both relay and state parameters.
    int relay = server.arg("relay").toInt();
    bool state = server.arg("state").toInt();
Converts the string query values to integer/boolean.
    if (relay >= 0 && relay < 4) {
      buttonData.buttonID = relay;
      buttonData.state = state;
      buttonStates[relay] = state;
Validates relay index, updates buttonData and local state array.
      esp_now_send(slaveMAC, (uint8_t *)&buttonData, sizeof(buttonData)); // Send toggle command to slave
    }
  }
Sends the command to the slave.
  server.send(200, "text/html", getHTMLPage()); // Send updated HTML page
}
Responds to the web client with the full updated HTML page.
“Turn ALL OFF” Web Handler: handleTurnAllOff()
void handleTurnAllOff() {
  for (int i = 0; i < 4; i++) {
Loops through all 4 relays.
    buttonStates[i] = false;
    buttonData.buttonID = i;
    buttonData.state = false;
Sets each relay’s state to OFF and fills the buttonData accordingly.
    esp_now_send(slaveMAC, (uint8_t *)&buttonData, sizeof(buttonData));
  }
Sends the command to the slave to turn off that relay.
  server.send(200, "text/html", getHTMLPage());
}
Responds to the browser with the updated HTML.
Main HTML Page Handler: handleRoot()
 handleRoot() {
  server.send(200, "text/html", getHTMLPage());
}
Handles the root web request ("/") by serving the main HTML page.
Return Relay States as JSON: handleRelayStates()
void handleRelayStates() {
  String json = "{ \"relays\": [";
Starts a JSON string with "relays" key.
  for (int i = 0; i < 4; i++) {
    json += feedbackData.relayStates[i] ? "1" : "0";
    if (i < 3) json += ",";
  }
Appends each relay state as 1 or 0, separated by commas.
  json += "], \"slaveConnected\": ";
  json += (slaveConnected ? "true" : "false");
  json += " }";
Adds the slaveConnected status to the JSON.
  server.send(200, "application/json", json);  // Send relay states as JSON
}
Sends the JSON as a response to the browser.
OLED Connecting Animation: showConnectingAnimation()
void showConnectingAnimation() {
  display.clearDisplay();
  display.setTextSize(1);
  display.setTextColor(WHITE);
Prepares OLED for displaying text with white color and small font.
  for (int i = 0; i < 3; i++) {
    display.setCursor(0, 0);
    display.println("Connecting");
Repeats 3 times. Shows “Connecting” text.
    for (int j = 0; j <= i; j++) {
      display.print(".");
    }
Adds one more dot each time (e.g., “.”, “..”, “…”).
    display.display();
    delay(500);
    display.clearDisplay();
  }
}
Displays the text, waits 500ms, then clears the screen for next animation frame.
setup() — Runs once when the ESP32 starts
void setup() {This is the main setup function in an Arduino sketch — it runs once when the ESP32 is powered on or reset.
Serial.begin(115200);
Initializes serial communication at a baud rate of 115200 for debugging using Serial.print() statements.
if (!display.begin(SSD1306_SWITCHCAPVCC, 0x3C)) {Initializes the OLED display at I2C address 0x3C. SSD1306_SWITCHCAPVCC tells the library how the display is powered.
Serial.println(F("SSD1306 allocation failed"));Prints an error message if OLED initialization fails. The F() macro saves SRAM by storing the string in flash.
while (true); // Stop execution if OLED initialization failsStops further execution by putting the ESP into an infinite loop.
display.setTextSize(1);Sets the font size for OLED text to small (1×).
display.setTextColor(WHITE);Sets the text color to white (on a black background).
showConnectingAnimation(); // Show connecting animation
Calls a custom function (defined elsewhere) to show a visual “connecting” animation on the OLED.
pinMode(LED_BUILTIN, OUTPUT); // Set built-in LED as output
Sets the on-board LED (GPIO 2) as an output pin so it can be controlled in code.
Button Setup with AceButton:
  for (int i = 0; i < numButtons; i++) {
    pinMode(buttonPins[i], INPUT_PULLUP);
Iterates through the buttonPins[] array (for 4 buttons), sets each pin as input with internal pull-up resistors.
    buttons[i].setEventHandler(handleButtonPress);
}
Assigns the custom event handler function handleButtonPress() for each button to detect presses/releases. Then the loop ends.
ButtonConfig::getSystemButtonConfig()->setEventHandler(handleButtonPress);Also sets the global button handler in case any button uses the default system configuration. Extra precaution.
Wi-Fi Access Point Setup:
WiFi.mode(WIFI_AP_STA);Sets Wi-Fi mode to Access Point + Station. AP is needed for local hosting, STA is needed if the ESP wants to connect to other networks.
WiFi.softAP(ssid, password);Starts an Access Point with the given ssid and password.
  IPAddress IP(192, 168, 4, 1);
  IPAddress gateway(192, 168, 4, 1);
  IPAddress subnet(255, 255, 255, 0);
Defines a static IP configuration (AP IP, gateway, and subnet) for the ESP32’s network.
WiFi.softAPConfig(IP, gateway, subnet);Applies the static IP settings to the Access Point.
Serial.println("AP Started: 192.168.4.1 (Link: http://192.168.4.1)");Prints the network info for the user to connect and access the web interface.
Web Server Route Setup:
server.on("/", handleRoot);
Defines the root (/) web page and assigns the handleRoot() function to serve it.
server.on("/toggle", handleToggle);Defines the /toggle endpoint to handle relay toggling.
server.on("/relay_states", handleRelayStates);Defines the /relay_states endpoint to return current relay states in JSON format.
server.on("/turn_all_off", handleTurnAllOff);Defines /turn_all_off to turn off all relays via web interface.
server.begin(); // Start the web serverStarts the web server to begin accepting HTTP requests.
ESP-NOW Initialization:
if (esp_now_init() != ESP_OK) {Initializes ESP-NOW. If it fails…
    Serial.println("ESP-NOW init failed");
    return;
…print an error and exit setup() early to avoid undefined behavior.
ESP-NOW Callback Registration:
  esp_now_register_send_cb(onDataSent);  // Register callback for data sent
  esp_now_register_recv_cb(onDataRecv);  // Register callback for data received
Registers two callback functions:
onDataSent→ called after sending dataonDataRecv→ called when data is received
Add Slave as Peer:
esp_now_peer_info_t peerInfo = {};Creates a blank struct to hold peer information (MAC, channel, encryption).
memcpy(peerInfo.peer_addr, slaveMAC, 6);Copies the slave’s MAC address into the peerInfo struct.
  peerInfo.channel = 0;
  peerInfo.encrypt = false;
Sets the communication channel to auto (0), and disables encryption.
  if (esp_now_add_peer(&peerInfo) != ESP_OK) {
    Serial.println("Failed to add peer");
    return;
  }
Tries to add the slave as a peer for ESP-NOW communication. Prints error and exits if it fails.
OLED Final Status:
  display.clearDisplay();
  display.setCursor(0, 0);
  display.println("Waiting feedback...");
  display.display();
Clears the OLED and displays “Waiting feedback…” — indicates system is ready and waiting for the slave to respond.
loop() — Runs repeatedly
void loop() {The main loop keeps running as long as the ESP32 is powered on.
server.handleClient(); // Handle incoming web server requestsContinuously checks for and handles any incoming HTTP requests from the web UI.
  for (int i = 0; i < numButtons; i++) {
    buttons[i].check();  // Check for button press events
  }
Scans all 4 buttons using the AceButton library for any press/release activity.
Feedback Watchdog:
cppCopyEdit if (millis() - lastFeedbackTime >= feedbackTimeout) {
Checks how long it has been since the last feedback was received from the slave. If it exceeds the timeout…
    digitalWrite(LED_BUILTIN, LOW);  // Turn off LED if no feedback
    slaveConnected = false;
Turns off built-in LED and marks slave as disconnected.
    display.clearDisplay();
    display.setCursor(0, 0);
    display.println("No feedback!\nCheck Slave.");
    display.display();
Displays a warning on the OLED: “No feedback! Check Slave.”
  } else {
    digitalWrite(LED_BUILTIN, HIGH); // Turn on LED if feedback received
    slaveConnected = true;
  }
If feedback is recent, it keeps the LED ON and confirms the slave is connected.
Slave ESP32 Code Guide
This code handles 4 relays, receives control commands from the master ESP32, sends feedback, and also allows manual control using buttons.
Quick Summary Table (Slave)
| Functionality | Description |
|---|---|
| Relay Control | 4 active-low relays controlled via ESP-NOW or push buttons |
| Button Handling | Uses AceButton for edge-triggered manual control |
| ESP-NOW Communication | Receives toggle commands and sends state feedback |
| Feedback Loop | Sends relay states to Master every 2 seconds |
| Connection Detection | Tracks Master connection success |
| Peer Setup | Registers Master’s MAC for ESP-NOW communication |
Here’s the breakdown:
Libraries and Namespace
#include <WiFi.h>
#include <esp_now.h>
#include <AceButton.h>
using namespace ace_button;- Includes required libraries:
WiFifor station mode,esp_nowfor wireless communication, andAceButtonfor handling button events. - Uses the
ace_buttonnamespace to simplify syntax.
Pin Definitions and Relay/Button States
const int relayPins[] = {23, 19, 18, 5};
const int numRelays = 4;
bool relayStates[numRelays] = {false, false, false, false};- Defines active-low relay pins.
- Stores current state of each relay (
false = OFF,true = ON).
const int buttonPins[] = {13, 12, 14, 27};- Defines input pins for manual push buttons.
AceButton buttons[numRelays] = {
  AceButton(buttonPins[0]), AceButton(buttonPins[1]),
  AceButton(buttonPins[2]), AceButton(buttonPins[3])
};- Creates an array of 4
AceButtonobjects for each push button.
Data Structures for Communication:
typedef struct {
  int buttonID;
  bool state;
} ButtonData;
ButtonData buttonData;ButtonData: received from Master (which button, what state).
typedef struct {
  bool relayStates[numRelays];
} FeedbackData;
FeedbackData feedbackData;FeedbackData: sent back to Master to update OLED and web UI.
Connection Status & Master MAC
bool masterConnected = false;
uint8_t masterMAC[] = {0xC0, 0x49, 0xEF, 0xD1, 0x25, 0x4C};- Tracks whether the master is connected (based on successful send).
- Replace
masterMACwith your actual master device’s MAC address.
ESP-NOW Receive Callback
void onDataRecv(const esp_now_recv_info_t *info, const uint8_t *incomingData, int len) {
memcpy(&buttonData, incomingData, sizeof(buttonData));- Fills
buttonDatawith values received from Master.
  int relayIndex = buttonData.buttonID;
  if (relayIndex >= 0 && relayIndex < numRelays) {
    relayStates[relayIndex] = buttonData.state;
    digitalWrite(relayPins[relayIndex], relayStates[relayIndex] ? LOW : HIGH);
    sendFeedbackToMaster();
  }
}- Updates the corresponding relay based on
buttonData. - Active-low logic used.
- Sends updated state back to Master.
ESP-NOW Send Callback
void onDataSent(const uint8_t *mac_addr, esp_now_send_status_t status) {
  masterConnected = (status == ESP_NOW_SEND_SUCCESS);
}- Updates
masterConnecteddepending on send success.
Feedback Sender
void sendFeedbackToMaster() {
  memcpy(feedbackData.relayStates, relayStates, sizeof(feedbackData.relayStates));
esp_now_send(masterMAC, (uint8_t *)&feedbackData, sizeof(feedbackData));- Fills feedback struct and sends it to Master.
  Serial.print("Sending feedback to master: ");
  for (int i = 0; i < 4; i++) {
    Serial.print(feedbackData.relayStates[i] ? "ON " : "OFF ");
  }
  Serial.println();
}- Logs current relay states to Serial Monitor for debugging.
Manual Button Handler
void handleButtonPress(AceButton *button, uint8_t eventType, uint8_t buttonState) {
  if (eventType == AceButton::kEventReleased) {
int buttonIndex = button->getPin();- Called when a button is released (you can customize for pressed too).
    for (int i = 0; i < numRelays; i++) {
      if (buttonPins[i] == buttonIndex) {
        relayStates[i] = !relayStates[i];
digitalWrite(relayPins[i], relayStates[i] ? LOW : HIGH);- Toggles the corresponding relay state.
        if (masterConnected) {
          sendFeedbackToMaster();
        }
        break;
      }
    }
  }
}- Sends feedback if Master is connected.
Setup Function
void setup() {
Serial.begin(115200);- Starts serial for debugging.
  for (int i = 0; i < numRelays; i++) {
    pinMode(relayPins[i], OUTPUT);
    digitalWrite(relayPins[i], HIGH); // All relays OFF (active-low)
}- Sets up relay pins and turns them all OFF initially.
  ButtonConfig *buttonConfig = ButtonConfig::getSystemButtonConfig();
buttonConfig->setEventHandler(handleButtonPress);- Configures AceButton event handler globally.
  for (int i = 0; i < numRelays; i++) {
    pinMode(buttonPins[i], INPUT_PULLUP);
    buttons[i].getButtonConfig()->setEventHandler(handleButtonPress);
}- Sets each button pin as
INPUT_PULLUPand assigns handler.
  WiFi.mode(WIFI_STA);
  if (esp_now_init() != ESP_OK) {
    Serial.println("ESP-NOW init failed");
    return;
}- Initializes ESP-NOW. Device set in station mode.
  esp_now_register_recv_cb(onDataRecv);
esp_now_register_send_cb(onDataSent);- Registers the callback functions for send/receive.
  esp_now_peer_info_t peerInfo = {};
  memcpy(peerInfo.peer_addr, masterMAC, 6);
  peerInfo.channel = 0;
  peerInfo.encrypt = false;
  if (esp_now_add_peer(&peerInfo) != ESP_OK) {
    Serial.println("Failed to add peer");
  }
}- Adds the master as a peer so the slave can send data to it.
Loop Function
void loop() {
  for (int i = 0; i < numRelays; i++) {
    buttons[i].check();
}- Constantly checks for button presses using AceButton.
  static unsigned long lastFeedbackTime = 0;
  if (millis() - lastFeedbackTime >= 2000) {
    lastFeedbackTime = millis();
    sendFeedbackToMaster();
  }
}
- Every 2 seconds, sends relay states to Master as feedback.
Testing the ESP32 ESP-NOW project

Initial Setup Checks
| Step | Action | Expected Outcome |
|---|---|---|
| 1 | Power up both ESP32 boards (Master & Slave) | Both devices should boot and initialize |
ESP-NOW Communication Test
| Step | Action | Expected Outcome |
|---|---|---|
| 2 | Press any button on the Master ESP32 | Relay on Slave toggles ON/OFF |
| 3 | Watch the built-in LED on Master (GPIO 2) | Turns ON only if Slave is connected |
| 4 | Check OLED display on Master | Relay states update accordingly |
| 5 | On Slave’s Serial Monitor | You should see “Sending feedback…” logs |
Manual Button Test on Slave
| Step | Action | Expected Outcome |
|---|---|---|
| 6 | Press a button on the Slave ESP32 | Corresponding relay toggles |
| 7 | If Master is powered and connected | Master OLED updates the change |

Web Interface Test
| Step | Action | Expected Outcome |
|---|---|---|
| 8 | Connect to Master ESP32’s Wi-Fi (AP mode). Enter AP name & password. | Use your PC or phone. |
| 9 | Open the assigned IP address “http://192.168.4.1” in a browser | Control panel with buttons should load |
| 10 | Click a toggle button on the web UI | Relay toggles via ESP-NOW to Slave |
| 11 | Click “All OFF” button | All relays turn OFF on the Slave |
| 12 | Check the browser console or OLED | States are synced across all interfaces |

Long-Term Feedback Test
| Step | Action | Expected Outcome |
|---|---|---|
| 13 | Leave the system idle for a few minutes | OLED updates every 2 seconds with feedback |
| 14 | Disconnect Slave temporarily | Master’s LED turns OFF (connection lost) |
| 15 | Reconnect Slave | LED turns ON again, system resumes |

Applications of the Project
- Home Automation – Control lights, fans, or appliances via web interface or physical buttons.
- Industrial Equipment Control – Wirelessly manage multiple machines without complex wiring.
- Remote Agriculture Monitoring – Operate irrigation pumps or greenhouse systems remotely.
- IoT-Based Smart Labs – Centralized control of instruments or setups using ESP32.
- Multi-Room Lighting System – Manage lighting across rooms from a single master controller.
- Wireless Test Benches – Ideal for labs needing switchable relay setups with feedback.
- Educational Kits – Demonstrates ESP-NOW wireless communication in IoT learning environments.
Conclusion
This project demonstrates a powerful wireless relay control system using ESP32 and ESP-NOW, with real-time feedback via OLED and web interface. It’s efficient, responsive, and ideal for smart home or industrial IoT applications.
I hope you like this ESP32 ESP-NOW project.
Click Here for more such ESP32 projects.
Please do share your feedback.


