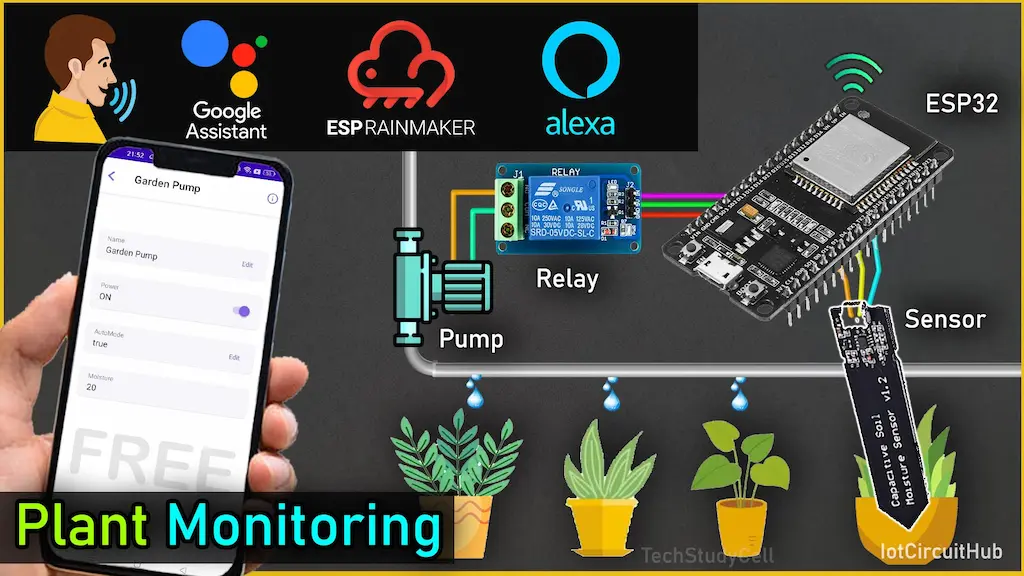
Smart gardening is one of the most practical real-world applications of IoT. In this project, we build an ESP32 Smart Plant Watering System that automatically waters plants based on soil moisture and lets you control everything from your phone — or even by voice using Google Assistant and Amazon Alexa.

The system is powered by ESP RainMaker, Espressif’s official cloud platform, so there’s no need to create your own mobile app or server. Device provisioning is done over BLE using a QR code, and all control happens through the RainMaker mobile app.

At the heart of the project is an ESP32, a capacitive soil moisture sensor, and a relay-controlled water pump.
Table of Contents
Required Components for the ESP32 Project

- ESP32 Development Board
- Capacitive Soil Moisture Sensor
- Relay Module (for water pump control)
- Submersible DC Water Pump
- Jumper Wires and Breadboard
- Power Supply (5V/USB)
Circuit of ESP32 Plant Watering System

The circuit connections are simple and beginner-friendly:
- Soil Moisture Sensor → Analog output connected to ESP32 GPIO34 (ADC)
- Relay IN Pin → Connected to ESP32 GPIO25
- Relay VCC and GND → Connected to ESP32 5V and GND
- Water Pump → Connected to relay output as a controlled load
- ESP32 → Powered via USB cable or external 5V adapter
⚡ Note: Always use a relay or MOSFET driver to safely operate pumps or motors.
Tutorial video on the Plant Watering System
Working Principle of IoT Plant Watering System
This ESP32-based irrigation controller continuously monitors soil moisture and automatically turns the water pump ON or OFF depending on user-defined limits.
You can also switch to Manual Mode from the RainMaker app and directly control the pump remotely or with voice commands.
Operating Modes
- Auto Mode (Default)
- ESP32 reads soil moisture every 5 seconds
- If moisture drops below the “Dry Limit,” the pump turns ON
- If moisture rises above the “Wet Limit,” the pump turns OFF
- Pump status is instantly synced to RainMaker
- Moisture percentage is periodically uploaded to the cloud
- Manual Mode
- Automatic watering is disabled
- Pump can be turned ON/OFF from the RainMaker app
- Voice control works via Google Assistant or Alexa
- Pump state updates instantly in the app
Program ESP32 with Arduino IDE
For this IoT-based project, I have used the Arduino IDE to program ESP32.
First update the Preferences –> Aditional boards Manager URLs: https://raw.githubusercontent.com/espressif/arduino-esp32/gh-pages/package_esp32_dev_index.json, http://arduino.esp8266.com/stable/package_esp8266com_index.json
- Then install the ESP32 board (2.0.5) from the Board Manager or Click Here to download the ESP32 board.
Source Codes for ESP RainMaker ESP32 IoT Project
Click on the following buttons to download the source code for this ESP32 project.
This code is provided free for project purpose and fair use only.
Please do mail us to [email protected] if you want to use it commercially.
Copyrighted © by Tech StudyCell
Get Sensor reading for the DRY & WET soil
To get the Calibration values for moisture reading from the sensor, first, upload the code “Get Sensor reading” to the ESP32.
Connect the Moisture Sensor AOUT pin with D34 and supply 3.3V across VCC and GND.
Then open the serial monitor with Baud rate 115200.

Now, note down the following values.
- Soil is very dry.
- Soil is very wet.
Later on, the ESP32 will calculate the moisture percentage according to these two values.
Now open the main sketch in Arduino IDE and update the following values.

Enter the deviceName according to your requirements.
Then enter the calibration values of the sensor for the DRY and WET soil types.
If required, modify the moisture threshold values (in %). In AUTO mode, the pump will start/stop according to these values.
Then select the relay type. For the Active-LOW relay make the flag true, for the Active-HIGH relay, make the flag false.
Paragraph-by-paragraph explanation
Below is a paragraph-by-paragraph explanation for every major code block, describing exactly what each section does and how it contributes to the project.
1. Library Includes
#include <Arduino.h>
#include "RMaker.h"
#include "WiFi.h"
#include "WiFiProv.h"
These libraries provide the core functionality of the project. Arduino.h gives access to standard Arduino functions. RMaker.h is the ESP RainMaker framework used for cloud connectivity, device creation, OTA, and parameters. WiFi.h manages Wi-Fi connections, while WiFiProv.h enables BLE provisioning so Wi-Fi credentials can be configured from the RainMaker mobile app using a QR code.
2. Device Identity and Provisioning Details
char nodeName[]   = "ESP32_Plant";
char deviceName[] = "Garden Pump";

const char *service_name = "PROV_Plant";
const char *pop = "PLANT123";
Here you define how your device appears in RainMaker. nodeName is the overall IoT node name, while deviceName is the actual controllable device (your pump).service_name and pop (Proof of Possession) are used during BLE provisioning. When onboarding the ESP32, these values are embedded in the QR code so the RainMaker app can securely pair with the device.
3. GPIO Pin Assignment
#define MOISTURE_PIN 34
#define RELAY_PIN    25
These lines assign ESP32 GPIO pins. GPIO34 reads the analog value from the capacitive soil moisture sensor. GPIO25 controls the relay module connected to the water pump.
4. Soil Sensor Calibration
int DRY_ADC = 2910;
int WET_ADC = 925;
These values represent your sensor’s calibration points. DRY_ADC is the ADC reading when soil is completely dry, and WET_ADC is the reading when soil is fully wet. These values are later mapped to a 0–100% moisture scale. Every sensor is different, so these numbers should be measured and adjusted for your own hardware.
5. Moisture Thresholds
int MOISTURE_MIN = 30;
int MOISTURE_MAX = 70;
These define the automatic watering limits. When moisture drops below 30%, the pump turns ON. When moisture rises above 70%, the pump turns OFF. This creates a hysteresis band so the relay does not rapidly toggle.
6. Relay Type and Status Pins
#define RELAY_ACTIVE_LOW true

static uint8_t wifiLed = 2;
static uint8_t gpio_reset = 0;
RELAY_ACTIVE_LOW tells the firmware whether your relay turns ON with LOW or HIGH logic. Most modules are active-LOW.wifiLed is a status LED that indicates Wi-Fi connection.gpio_reset uses the ESP32 BOOT button to reset Wi-Fi credentials or perform a factory reset depending on how long it’s pressed.
7. Runtime State Variables
bool autoMode = true;
bool cloudRelayState = false;
bool actualRelayState = false;
These variables hold the system state:
autoModedecides whether watering is automatic or manual (controlled from RainMaker).cloudRelayStatestores manual ON/OFF commands coming from the app.actualRelayStatereflects the real physical state of the relay. This prevents unnecessary cloud updates.
8. RainMaker Device and Parameters
static Switch pump(deviceName);
static Param autoParam("AutoMode", "esp.param.bool",
                       value(true),
                       PROP_FLAG_READ | PROP_FLAG_WRITE);

static Param moistureParam("Moisture", "esp.param.int",
                           value(0),
                           PROP_FLAG_READ);

Node node;
Here the RainMaker objects are created:
pumpis a standard RainMaker Switch device.autoParamallows enabling or disabling Auto Mode from the app.moistureParampublishes soil moisture percentage to the cloud (read-only).noderepresents the overall ESP32 device in RainMaker.
9. Relay Control Function
void applyRelay(bool on) {

  if (actualRelayState == on) return;

  actualRelayState = on;

  if (RELAY_ACTIVE_LOW)
    digitalWrite(RELAY_PIN, on ? LOW : HIGH);
  else
    digitalWrite(RELAY_PIN, on ? HIGH : LOW);

  pump.updateAndReportParam(ESP_RMAKER_DEF_POWER_NAME, actualRelayState);
}
This function controls the physical relay and immediately updates RainMaker with the new pump status. If the requested state is already active, it exits early to avoid unnecessary cloud traffic. This design ensures pump feedback appears instantly in the RainMaker app while minimizing server requests.
10. Moisture Reading Function
int readMoisture() {
  int adc = analogRead(MOISTURE_PIN);
  int pct = map(adc, DRY_ADC, WET_ADC, 0, 100);
  return constrain(pct, 0, 100);
}
The ESP32 reads the raw ADC value from the sensor, maps it between dry and wet calibration values, converts it into a percentage, and constrains the result between 0 and 100. This gives a user-friendly soil moisture reading.
11. Provisioning Event Handler
void sysProvEvent(arduino_event_t *sys_event) {This callback listens for system events. When provisioning starts, it prints a QR code payload to the Serial Monitor for BLE onboarding. When Wi-Fi connects, it turns ON the status LED. This gives visual feedback that the device is online.
12. RainMaker Write Callback
void write_callback(Device *device, Param *param,
                    const param_val_t val,
                    void *priv_data,
                    write_ctx_t *ctx) {
This function is called whenever the RainMaker app changes a parameter.
- If the Power parameter changes, the relay is updated only when Auto Mode is OFF (manual control).
- If AutoMode changes, the local
autoModevariable is updated.
This allows seamless switching between automatic and manual operation.
13. setup()
void setup() {The setup() function initializes everything:
- Starts Serial communication.
- Configures GPIO pins.
- Turns the pump OFF initially.
- Creates the RainMaker node and adds device parameters.
- Enables OTA updates, scheduling, and timezone services.
- Starts RainMaker cloud.
- Registers provisioning events.
- Begins BLE provisioning so the device can be added to the RainMaker app.
This is where the ESP32 becomes a fully cloud-connected IoT device.
14. Main Loop Timer
unsigned long moistureTimer = 0;This variable tracks when moisture was last sent to the cloud, allowing updates every 5 seconds without blocking the program.
15. loop()
void loop() {The loop continuously performs five tasks:
Reset Handling
Long-pressing the BOOT button resets Wi-Fi or performs a factory reset.
Wi-Fi Status
The LED reflects whether the ESP32 is connected.
Moisture Reading
Soil moisture is read every loop iteration.
Automatic Watering Logic
if (autoMode) {
  if (moisture <= MOISTURE_MIN) applyRelay(true);
  if (moisture >= MOISTURE_MAX) applyRelay(false);
}
In Auto Mode, the pump is controlled purely by soil moisture using the defined thresholds.
Cloud Updates Every 5 Seconds
if (millis() - moistureTimer > 5000) {
  moistureTimer = millis();
  moistureParam.updateAndReport(value(moisture));
}
Moisture percentage is uploaded every 5 seconds, providing live monitoring while keeping cloud traffic low.
This code creates a fully automated ESP32-based smart irrigation controller:
- Soil moisture controls the pump in Auto Mode
- Manual pump control is available from RainMaker
- Pump status is reported instantly
- Moisture data is sent every 5 seconds
- BLE provisioning simplifies Wi-Fi setup
- OTA updates allow remote firmware upgrades
The result is a clean, cloud-connected plant watering system with minimal server usage and real-time feedback — perfect for modern smart gardening.
PCBWay – Professional PCB Assembly Services
PCBWay not only produces FR-4 and Aluminum boards but also advanced PCBs like Rogers, HDI, andFlexible and Rigid-Flex boards, at very affordable prices.

PCBWay provides fast, high-quality PCB assembly with lead times from just 24 hours, offering Turn-key, Partial Turn-key, and Consigned options to suit your project needs.
You can also participate in the PCBWay Mascot 3D Printing Design Contest
- Open to all 3D printing enthusiasts
- PCBWay’s first-ever 3D Printing Design Contest
- Design either PCBWay mascot “Eon” or your own original character

- Upload the project on PCBWay Open Source Community
- Select CNC & 3D Printing category
- Mention Eon Theme or Open Creative
- Add title, description & required files
- Click Submit
Setting Up ESP RainMaker
ESP RainMaker is Espressif’s free IoT platform for ESP32 that allows you to connect your project to the cloud and control it using the ESP RainMaker mobile app.
It also supports integration with Alexa and Google Home.

🧩 Steps:
- Install the ESP RainMaker app (available on Android & iOS).
- Log in using your Espressif ID or Google account.
- Power up the ESP32 — it will start BLE provisioning mode.
- Press and hold the BOOT button for 10 seconds.
- Turn on the mobile Bluetooth and GPS (Location).
- Scan the QR code from the Serial Monitor.
- Connect to your Wi-Fi through the app.

Once the setup is done, the device will appear on your dashboard, allowing you to control the LED’s brightness directly.
Please refer to the following article to add the devices to the ESP RainMaker app.
Now, please refer to the following articles to connect the ESP RainMaker with Amazon Alexa and Google Home App.
After doing all these steps, you can control the appliances with Google Assistant and Amazon Alexa.

By default, the system will be in AUTO mode. To go to Manual mode, tap on the device, then tap on “Edit” beside “Auto Mode” and make it false.
AutoMode = true→ Automatic watering (sensor controls pump)AutoMode = false→ Manual control (you control the pump)

Conclusion
This ESP32 Smart Plant Watering System demonstrates how powerful and accessible IoT can be when combined with ESP RainMaker. With automatic irrigation, cloud monitoring, and voice control through Google Assistant and Alexa, your plants get exactly the water they need — even when you’re away from home.
It’s a low-cost, scalable, and professional-grade smart irrigation solution that’s perfect for learning ESP32 IoT while solving a real-world problem.
If you’re looking to build a modern, cloud-connected plant watering system, this project is a fantastic place to start.


