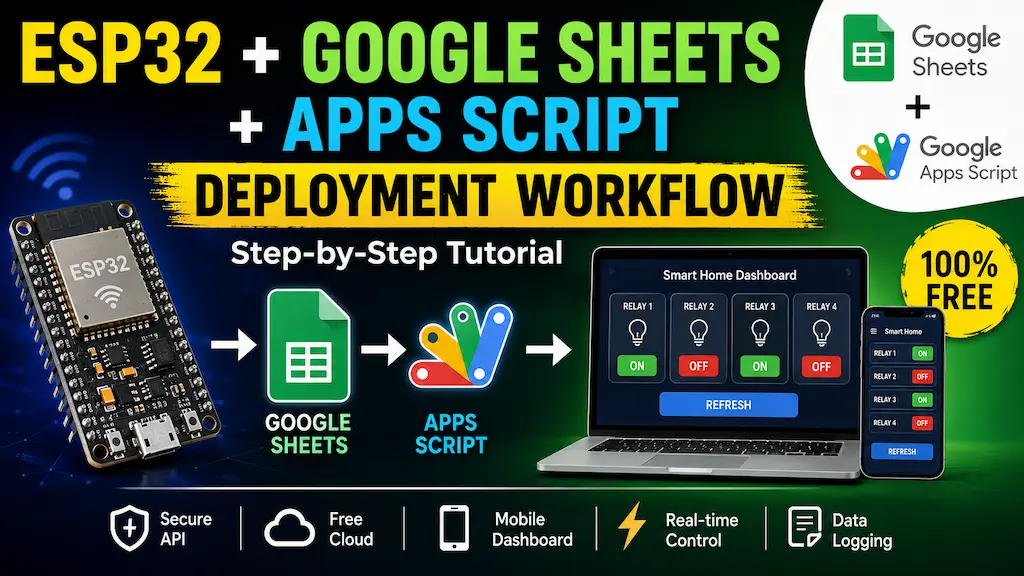
Google Sheets and Google Apps Script provide a very simple cloud backend for ESP32 IoT projects. Instead of using Firebase, MQTT, or a custom server, we can use a Google Sheet to store device data and control the ESP32 or ESP8266 remotely.
This workflow is beginner-friendly and ideal for:
- Home automation
- Relay control
- Sensor monitoring
- Data logging
- IoT dashboards
- DIY ESP32/ESP8266 projects
The complete communication flow is:
ESP32 ↔ Google Apps Script ↔ Google Sheet ↔ Web DashboardIn this article, we will understand the complete deployment workflow step by step.
Table of Contents
Step-by-Step Setup Guide
Step 1: Create a Google Sheet
Create a new Google Sheet.
This sheet will store all IoT data.
You can create sheets like:
statelogssensor_data
Example:
| relay1 | relay2 | relay3 | relay4 |
|---|---|---|---|
| 1 | 0 | 1 | 0 |
Purpose of Each Sheet
state: Stores the latest relay status.
logs: Stores relay activity history and timestamps.
Step 2: Open Google Apps Script
From the Google Sheet:
Extensions → Apps ScriptApps Script opens in a new tab.
This script becomes the backend API for the ESP32.
Step 3: Create the Backend API Using Code.gs
Delete the default Apps Script code.
Paste your final Code.gs file.
The Code.gs file works as the main backend API for the project.
It handles:
- ESP32 requests
- dashboard requests
- Google Sheet read/write operations
- security validation
- JSON responses
What Does Code.gs Do?
The workflow looks like this:
ESP32 → Code.gs → Google Sheet
Dashboard → Code.gs → Google Sheet
Instead of directly accessing the Google Sheet, both the ESP32 and dashboard communicate with Code.gs.
This makes the system:
- cleaner
- more secure
- easier to manage
Step 4: Configure User Settings in Code.gs
At the top of Code.gs, we store important project settings.
Example:
const SPREADSHEET_ID =
"YOUR_GOOGLE_SHEET_ID";

const ESP32_KEY =
"your_esp32_secure_key";

const DASHBOARD_PIN =
"1234";- SPREADSHEET_ID: Used to connect Apps Script with the Google Sheet.
- ESP32_KEY: Used to authenticate ESP32 requests.
- DASHBOARD_PIN: Used to protect dashboard access.
Step 5: Create Index.html
In Apps Script:
File → New → HTML FileCreate a file named:
IndexPaste the dashboard HTML code.
The dashboard provides:
- relay ON/OFF buttons
- mobile-friendly UI
- PIN login
- manual refresh button
- relay state display
Step 6: Deploy the Web App
In Apps Script:
Deploy → New Deployment → Web AppDeployment Settings
Execute As
MeWho Has Access
AnyoneChoose the option that allows ESP32 access.
After deployment, Apps Script generates a URL ending with:
/execCopy this URL.
This becomes the cloud API endpoint.
Step 7: Configure the ESP32 Sketch
Open the Arduino sketch.
Add Wi-Fi Credentials
const char* ssid = "YOUR_WIFI";
const char* password = "YOUR_PASSWORD";
Add the Web App URL
const char* GOOGLE_SCRIPT_URL =
"https://script.google.com/macros/s/XXXX/exec";
Add ESP32 API Key
const char* ESP32_KEY =
"esp32_secure_key";
The ESP32 key must match the key used in Code.gs.
Step 9: Upload the ESP32 Code
Select the ESP32 board in Arduino IDE and upload the sketch.
After boot:
- ESP32 connects to Wi-Fi
- relay states synchronize with Google Sheet
- dashboard becomes active
Step 10: Open the Dashboard
Open the deployed /exec URL in a browser.
Enter the dashboard PIN.
Now you can:
- control relays
- refresh current states
- monitor device status
How the Complete System Works
Now let us understand how each file works internally.
The project contains four main parts:
- ESP32 Sketch
- Code.gs
- Index.html
- Google Sheet
Each part has a different responsibility in the system.
How Code.gs Works
The Code.gs file acts as the backend API.
Workflow:
ESP32 ↔ Code.gs ↔ Google Sheet
Dashboard ↔ Code.gs ↔ Google Sheet
Instead of directly accessing the Google Sheet, both the ESP32 and dashboard communicate with Code.gs.
This makes the project:
- cleaner
- more secure
- easier to maintain
Main Responsibilities of Code.gs
The backend performs several important tasks.
1. Receives ESP32 Requests
The ESP32 sends HTTPS requests to Apps Script.
Example:
?action=set&relay1=1
The backend reads:
- relay states
- action type
- authentication key
and processes the request.
2. Updates Google Sheet Data
Apps Script writes relay states into the state sheet.
Example:
| relay1 | relay2 | relay3 | relay4 |
|---|---|---|---|
| 1 | 0 | 1 | 0 |
This allows the dashboard and ESP32 to remain synchronized.
3. Stores Logs
Every relay change is also saved in the logs sheet.
Example:
| timestamp | relay1 | relay2 | relay3 | relay4 | source |
|---|---|---|---|---|---|
| 2026-05-17 | 1 | 0 | 1 | 0 | html |
This helps track relay activity history.
4. Handles Dashboard Login
The dashboard sends the PIN to Apps Script.
Code.gs verifies whether the PIN is correct.
If valid:
- dashboard unlocks
If invalid:
- access is denied
5. Returns JSON Responses
Apps Script returns relay data in JSON format.
Example:
{
  "relay1": 1,
  "relay2": 0,
  "relay3": 1,
  "relay4": 0
}
The ESP32 and dashboard read this JSON data to update their state.
How Index.html Works
The Index.html file creates the web dashboard.
This is the frontend interface that users interact with.
The dashboard provides:
- relay ON/OFF buttons
- refresh button
- login screen
- relay status display
- mobile-friendly interface
Dashboard Workflow
Step 1: User Opens Dashboard
The browser loads the deployed Apps Script web app.
Example:
https://script.google.com/macros/s/XXXX/exec
Step 2: Login Screen Appears
The user enters the dashboard PIN.
The dashboard sends the PIN to:
verifyPin()
inside Code.gs.
Step 3: Dashboard Unlocks
If the PIN is correct:
- the relay control panel becomes visible
- current relay state loads
Step 4: User Controls Relays
When a relay button is pressed:
Turn ON
Turn OFF
the dashboard sends the relay state to:
setStateFromHtml()
inside Code.gs.
Apps Script updates the Google Sheet.
Step 5: Refresh Button Updates State
The dashboard uses a manual refresh system instead of aggressive auto polling.
When the user presses:
Refresh
the dashboard fetches the latest relay state from Apps Script.
This reduces unnecessary Apps Script usage and helps stay within free quotas.
How the ESP32 Sketch Works
The ESP32 sketch controls the hardware side of the project.
Its responsibilities are:
- connect to Wi-Fi
- control relays
- read manual switches
- communicate with Apps Script
- synchronize relay states
PCBWay – One-Stop PCB Manufacturing & Assembly Solution
PCBWay is a leading PCB manufacturer offering fast and reliable PCB fabrication with lead times as short as 12 hours. They support advanced PCB technologies, including FR4, FPC, Aluminum, Rogers, HDI, Rigid-Flex, RF/Microwave boards, heavy copper PCBs, and multilayer boards up to 24 layers.

PCBWay also provides turnkey PCB assembly services, handling component sourcing, PCB production, assembly, testing, and delivery. Their assembly capabilities include BGA, Micro-BGA, QFN, and other complex package types, making them an ideal partner for both prototyping and production.
For more details: PCBWay – Expert PCB Layout Services

Why Google Sheets Was Chosen
Google Sheets is:
- free
- beginner friendly
- easy to debug
- easy to visualize
Readers can directly see:
- relay changes
- device activity
- log history
without needing database knowledge.
Overall System Workflow
The complete workflow looks like this:
Dashboard
↓
Code.gs
↓
Google Sheet
↓
ESP32
and
ESP32
↓
Code.gs
↓
Google Sheet
↓
Dashboard
This creates a simple cloud-connected IoT system using free Google tools.
Advantages of This Architecture
- No Firebase required
- Easy deployment
- Beginner friendly
- Simple debugging
- Free cloud backend
- Mobile dashboard support
- Secure API structure
- Excellent for educational projects
Limitations
Google Sheets and Apps Script are not fully real-time platforms.
Compared to:
- Firebase
- MQTT
- WebSockets
they are slower for rapid synchronization.
For best performance:
- avoid excessive polling
- update only when values change
- use manual refresh where possible
Conclusion
ESP32 + Google Sheets + Apps Script is one of the simplest ways to create a cloud-connected IoT system.
The project demonstrates:
- cloud communication
- remote relay control
- dashboard development
- backend API creation
- IoT synchronization
using completely free Google services.
This architecture is ideal for:
- IoT beginners
- DIY automation
- educational tutorials
- ESP32 learning projects


